python3简易接口自动化测试框架设计与实现实例2

bzdmz bzdmz     2022-12-14     265

关键词:

目录
  1、开发环境
  2、用到的模块
  3、框架设计 ?3.1、流程
  3.2、项目结构
  5、日志打印
  6、接口请求类封装
  7、Excel数据读取
  7.1、读取配置文件
  7.1、编写Excel操作类
  8、用例组装
  9、用例运行结果校验
  10、运行用例
  11 、小结
  1、开发环境
  操作系统:Ubuntu18
  开发工具:IDEA+PyCharm插件
  Python版本:3.6
  2、用到的模块
  requests:用于发送请求
  xlrd:操作Excel,组织测试用例
  smtplib,email:发送测试报告
  logging:日志追踪
  json:数据格式化
  Django:接口开发
  configparser:读取配置文件
  3、框架设计
  3.1、流程
技术图片
  接口用例是通过Excel来组织的,定义了URL,Request Body等列。执行流程如下:
  使用xlrd工具读取Excel中的信息,拼接成一个个完整的请求。
  接口请求类拿到一个个完整的请求的去执行,这个过程需要记录日志,每一次执行情况都要有迹可循。
  回填测试结果,发送邮件,归档每次的运行结果。更好一点的做法是把历史运行情况做个报表,更直观。
  优点:
  用例通过Excel来组织,不需要编写代码,上手难度小。
  在用例个数不是很多的情况,开发速度快。
  缺点:
  用例依赖是痛点。
  只能支持接口自动化用例。
  Excel中用例无法预先检查正确性,只有跑一把才能知道。
  无法很好地管理大量用例,且不支持团队协同作业,个人用来回归测试或上线后的冒烟测试会是一个不错的选择。
  通过优缺点的对比,可以明显发现这个框架的硬伤其实很多了。所以无论是业界开源的自动化测试框架或企业自研的还没有见过用Excel来组织用例的。值得一提的是个别企业自研的自动化框架非常难用,抑或是把一堆工具简单组合到一起。根本无法提高团队的生产力。不过好的产品也不是一蹴而就的,需要一个持续优化的过程。所以上面用Excel组织用例的框架还是值的玩一玩的,暂且命名为apitest吧。目前比较好的自动化测试框架有unittest,testng,pytest等。
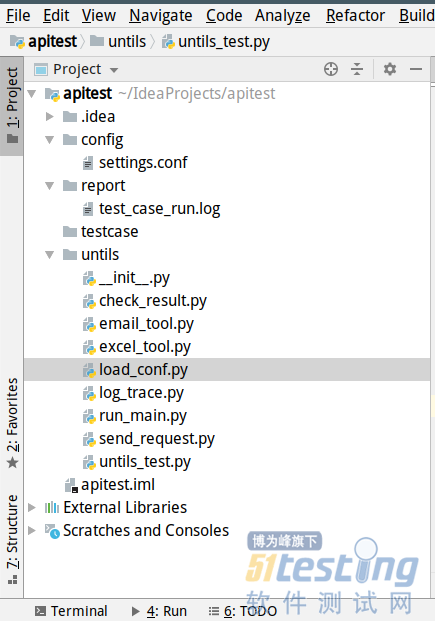
  3.2、项目结构
技术图片
  testcase:存放测试用例或请求的json文件。
  config:配置文件。
  report:测试报告和日志文件及其归档。
  untils:工具集,send_request用来发送请求,email_tool用来发送邮件,excel_tool用来读取Excel中的数据,check_result用来校验结果,run_main用例执行入口,log_trace用来追踪日志。
5、日志打印
  采用内置logging模块才记录运行日志,设置日志级别。
  log_trace.log:
   import  logging
  filename = "../report/test_case_run.log"
  logging.basicConfig(level=logging.INFO,
  format=‘%(asctime)s %(levelname)s1 %(filename)s [line:%(lineno)d]  %(message)s‘,
  datefmt=‘%a, %d %b %Y %H:%M:%S‘,
  filename=filename,
  filemode=‘w‘)
  6、接口请求类封装
   安装第三方模块requests
 pip install requests
  定义函数send_request,根据传入的方法类型分别去调用request的get,post,delete,put等方法去发送请求。send_request.py:
   import  requests
  from untils. log_trace import  *
  #发送get请求
  def get_request(url,data=None,headers=None):
  res = requests.get(url=url,data=data,headers=headers)
  return res
  #发送post请求
  def post_request(url,data,headers=None):
  res = requests.post(url=url,data=data,headers=headers)
  return res
  #发送delete请求
  def del_request(url,data=None,headers=None):
  res = requests.delete(url,data=data)
  return res
  #发送put请求
  def put_request(url,data,headers=None):
  pass
  def send_request(method,url,data=None,headers=None):
  try:
  logging.info(headers)
  if headers:
  if method == "GET":
  return get_request(url,data,headers=headers)
  if method == "POST":
  return post_request(url,data=data,headers=headers)
  if method == "DELETE":
  return  del_request(url,data=data,headers=headers)
  #put使用频率低,暂时不写
  if method == "PUT":
  return  put_request(url,data=data,headers=headers)
  else:
  logging.info("Header is null")
  except Exception as e:
  logging.info("send request fail:%s"%e)
  在untils_test.py中编写代码测试send_request方法,代码如下:
   #coding:utf-8
  from untils.send_request import send_request
  def test_send_request():
  url="http://127.0.0.1:9000/articles/"
  headers =
  "X-Token":"0a6db4e59c7fff2b2b94a297e2e5632e"
  
  res = send_request("GET",url,headers=headers)
  print(res.json())
  if __name__ == "__main__":
  test_send_request()
  运行结果:
   /usr/bin/python3.6 /home/stephen/IdeaProjects/apitest/untils/untils_test.py
  ‘status‘: ‘BS.200‘, ‘all_titles‘: ‘amy1‘: ‘alive‘, ‘modifytest‘: ‘alive‘, ‘addTest‘: ‘alive‘, ‘msg‘: ‘query articles sucess.‘
  Process finished with exit code 0
7、Excel数据读取
  用例是放在Excel中的,用xlrd来读取数据,写数据需要用到xluntils,先安装:
  pip install xlrd
  pip install xluntils
  7.1、读取配置文件
  读取Excel数据,我们需要知道对应的行和列,列相对固定,在配置文件settings中定义,然后读取,行作为参数传入。conf/settings文件中的定义如下:
[excel]
  case_no=0
  case_name=1
  is_run=2
  case_level=3
  case_header=4
  case_cookies=5
  req_type=6
  case_url=7
  case_body=8
  expect_result=9
  operator=10
  actual_result=11
  test_result=12
在unitls/load_conf.py中编写读取配置的方法,获取各项列值的方法。lood_conf()函数需要传入两个参数:配置项字符串标识符,配置项类型。比如要读取excel下整数case_url:lood_conf("excel.case_url","int")。class excel_config()下定义返回各项列值的方法。
  完整代码如下:
 import  configparser
  ‘‘‘
  read conf from setting.conf
  @:parameter:identstr,value_type
  value_type:"int" or "str"
  ‘‘‘
  def lood_conf(identstr,value_type):
  cf = configparser.ConfigParser()
  cf.read("../config/settings.conf")
  idenlist = identstr.split(‘.‘)
  if value_type == "int":
  try:
  value = cf.getint(idenlist[0],idenlist[1])
  return  value
  except (configparser.NoSectionError ,configparser.NoOptionError) as e:
  print(e)
  if value_type == "str":
  try:
  value = cf.get(idenlist[0],idenlist[1])
  return value
  except (configparser.NoSectionError ,configparser.NoOptionError) as e:
  print(e)
  ‘‘‘
  获取url,request body等的列号
  ‘‘‘
  class excel_config():
  #获取用例编号的列
  def caseno_col(self):
  return lood_conf("excel.case_no","int")
  def casename_col(self):
  return lood_conf("excel.case_name","int")
  def isrun_col(self):
  #print(lood_conf("excel.is_run","int"))
  return lood_conf("excel.is_run","int")
  def level_col(self):
  return lood_conf("excel.case_level","int")
  def header_col(self):
  return lood_conf("excel.case_header","int")
  def cookies_col(self):
  return lood_conf("excel.case_cookies","int")
  def reqtype_col(self):
  return lood_conf("excel.req_type","int")
  def caseurl_col(self):
  return lood_conf("excel.case_url","int")
  def casebody_col(self):
  return lood_conf("excel.case_body","int")
  def expectresult_col(self):
  return lood_conf("excel.expect_result","int")
  def actualresult_col(self):
  return lood_conf("excel.actual_result","int")
  def testresult_col(self):
  return lood_conf("excel.test_result","int")
  def test_operator_col(self):
  return lood_conf("excel.operator","int")
7.1、编写Excel操作类
  unitls/excel_tool.py中定义了获取用例编号,用例名称等方法,需要传入行。回写测试结果,回写实际结果方法需要传入两个参数:行,值。完整代码如下:
   #coding:utf-8
  import xlrd
  from untils.log_trace import *
  from xlutils.copy import copy
  from untils.load_conf import excel_config
  class excel_tool():
  def __init__(self,excel_name):
  self.curr_excel = xlrd.open_workbook(excel_name)
  self.table = self.curr_excel.sheet_by_index(0)
  #print(self.table.cell(1,1).value)
  #实例化excel_config
  self.config = excel_config()
  self.rows = self.table.nrows
  self.excel_name = excel_name
#获取用例编号
  def get_caseno(self,row):
  caseno = self.table.cell(row,self.config.caseno_col()).value
  if caseno:
  return caseno
  else:
  logging.info("case no is null")
  return None
  #获取用例名称
  def get_casename(self,row):
  casename = self.table.cell(row,self.config.casename_col()).value
  return casename
  #获取是否运行标志
  def get_runflag(self,row):
  run_flag = self.table.cell(row,self.config.isrun_col()).value
  return run_flag
  #获取用例级别
  def get_caselevel(self,row):
  caselevel = self.table.cell(row,self.config.level_col()).value
  return caselevel
  #获取请求url
  def get_caseurl(self,row):
  caseurl = self.table.cell(row,self.config.caseurl_col()).value
  return caseurl
  #获取请求body
#获取请求body
  def get_casebody(self,row):
  case_body = self.table.cell(row,self.config.casebody_col()).value
  return case_body
  #获取header
  def get_headerflag(self,row):
  headerflag = self.table.cell(row,self.config.header_col()).value
  return headerflag
  #获取coocikes
  def get_cookiesflag(self,row):
  cookiesflag = self.table.cell(row,self.config.cookies_col()).value
  return cookiesflag
  #获取请求类型
  def get_methodtype(self,row):
  method_type = self.table.cell(row,self.config.reqtype_col()).value
  return method_type
  #获取预期结果
  def get_expectres(self,row):
  expect_res = self.table.cell(row,self.config.expectresult_col()).value
  return expect_res
  #获取测试结果
def get_testres(self,row):
  test_res= self.table.cell(row,self.config.testresult_col()).value
  return test_res
  #获取操作符
  def get_operator(self,row):
  operator = self.table.cell(row,self.config.test_operator_col()).value
  return operator
  #回写测试结果到excel
  def write_testres(self,row,value):
  wbook = copy(xlrd.open_workbook(self.excel_name))
  sheet = wbook.get_sheet(0)
  sheet.write(row, self.config.testresult_col(), value)
  wbook.save(self.excel_name)
  #回写实际结果
  def write_actualres(self,row,value):
  wbook = copy(xlrd.open_workbook(self.excel_name))
  sheet = wbook.get_sheet(0)
  sheet.write(row, self.config.actualresult_col(), value)
  wbook.save(self.excel_name)
 8、用例组装
  有了Excel操作类,就可以方便读取数据和回填结果了。接下来,在unitls/run_main.py中来组装用例。组装之前,先获取是否运行的标志:
  运行标志为N,不组装,将用例标记为skiiped,回填测试结果到Excel文件中。
  运行标志为Y,开始组装用例并执行,并对比预期结果和实际结果。
  用例执行通过,将用例标记为pass,回填测试结果和实际结果,实际结果为接口的返回。
  用例执行失败,将用例标记为failed,回填测试结果和实际结果。
  接口鉴权需要用到的headers,先在run_main.py 中写死,这个问题后面解决,在上面的过程中,增加必要的日志,方便定位问题和查看用例的运行日志。完整代码如下:
#coding:utf-8
  from untils.excel_tool import excel_tool
  from untils.send_request import send_request
  from untils.log_trace import *
  from untils.check_result import CheckResult
  import  json
  headers =
  "X-Token":"0a6db4e59c7fff2b2b94a297e2e5632e"
  
  class runner():
  def __init__(self):
  self.excel = excel_tool("../testcase/test.xls")
  self.check = CheckResult()
  def join_case(self):
  global  skip_list,sucess_list,failed_list,skip_list
  sucess_list = []
  sucess_list = []
  failed_list = []
  skip_list = []
  for row in range(1,self.excel.rows):
  no = self.excel.get_caseno(row)
  url = self.excel.get_caseurl(row)
  isrun = self.excel.get_runflag(row)
  name = self.excel.get_casename(row)
  level = self.excel.get_caselevel(row)
  data = self.excel.get_casebody(row)
  expect_res = self.excel.get_expectres(row)
  method = self.excel.get_methodtype(row)
  hasheader = self.excel.get_headerflag(row)
  operator = self.excel.get_operator(row)
  if isrun == "Y":
  logging.info("Begin to run test case : %s,case number :%s" %(name,no))
  logging.info("Request method type is :%s" %method)
  logging.info("Request URL:%s" %url)
  logging.info("Request Body:%s" %json.dumps(json.loads(data),sort_keys=True,indent=2))
  res = send_request(method,url,data=data,headers=headers)
  is_sucess = self.check.cmpdict(eval(expect_res),eval(res.text),operator)
  print(is_sucess)
  if is_sucess:
  sucess_list.append(name)
  #回写测试结果
  self.excel.write_testres(row,"pass")
  #回写实际结果
  self.excel.write_actualres(row,res.text)
  logging.info("Test case %s run sucess." %name)
  else:
  failed_list.append(name)
  print("fail",is_sucess)
  #回写测试结果
  self.excel.write_testres(row,"failed")
  #回写实际结果
  self.excel.write_actualres(row,res.text)
  logging.error("Test case %s run fail." %name)
  logging.info("Response is:%s" %json.dumps(res.json(),sort_keys=True,indent=2))
  else:
  skip_list.append(name)
  self.excel.write_testres(row,"skipped")
  def sum(self):
  total = len(sucess_list)+len(failed_list) + len(skip_list)
  failed = len(failed_list)
  sucess = len(sucess_list)
  logging.info("-----------------------------------------------------------")
  logging.info("本次一共运行:%s 个用例" %total)
  logging.info("本次运行通过:%s 个用例" %sucess)
  logging.info("本次运行跳过:%s 个用例" %len(skip_list))
  logging.info("跳过的用例:%s" %skip_list)
  logging.info("-----------------------------------------------------------")
  9、用例运行结果校验
  在untils/run_main.py中方法cmpdict()是用来校验预期和结果实际结果是否匹配,需要传入三个参数:预期结果字典,实际结果字典,操作符。在check_result.py中编写校验用例结果的方法。目前只支持两种操作符,equal和notequal,预期结果为字典,其中不能嵌套字典。和完整代码如下:
from untils.log_trace import *
  class  CheckResult():
  def dict_value(self,key,actual):
  try:
  if key in actual:
  return actual[key]
  else:
  for keys in actual:
  return self.dict_value(key,actual[keys])
  except Exception as e:
  logging.error(e)
  return None
  def cmpdict(self,expect,actual,equal):
  logging.info("Begin to check result of  testcase.")
  is_dict = isinstance(expect,dict) and isinstance(actual,dict)
  if is_dict:
  if equal == "equal":
  for key in expect.keys():
  if expect[key] == self.dict_value(key,actual):
  logging.info("%s is equal to %s" %(expect[key],self.dict_value(key,actual)))
  return True
  else:
 
logging.error("%s is not equal to %s" %(expect[key],self.dict_value(key,actual)))
  return False
  if equal == "notequal":
  for key in expect.keys():
  if key != self.dict_value(key,actual):
  logging.info("%s is not equal to %s" %(expect[key],self.dict_value(key,actual)))
  return True
  else:
  logging.error("%s is equal to %s" %(expect[key],self.dict_value(key,actual)))
  return False
  else:
  logging.error("Operator :%s is not support now,you can define it in file[check_result.py]" %equal)
  else:
  logging.error("Expect or actual  result is not dict,check it in  excel. ")
  10、运行用例
  新建一个名称为test.xls的Excel,将其放到testcase路径下,并在Excel中编写测试用例。接口开发请参考:使用Django开发简单接口:文章增删改查,我准备的用例如下:
技术图片
 
  在untils/untils_test.py中导入run_mian模块来测试一下:
   from untils.run_main import runner
  if __name__ == "__main__":
  #test_send_request()
  runner = runner()
  runner.join_case()
  runner.sum()
  
运行untils_test.py,然后去到Excel中查看运行结果:
技术图片
report路径下查看测试用例运行日志,如下所示:
 Sat, 11 May 2019 19:37:56 INFO check_result.py [line:16]  Begin to check result of  testcase.
  Sat, 11 May 2019 19:37:56 ERROR check_result.py [line:38]  Operator :e1qual is not support now,you can define it in file[check_result.py]
  Sat, 11 May 2019 19:37:56 INFO run_main.py [line:37]  Begin to run test case : 查询文章,case number :1.0
  Sat, 11 May 2019 19:37:56 INFO run_main.py [line:38]  Request method type is :GET
  Sat, 11 May 2019 19:37:56 INFO run_main.py [line:39]  Request URL:http://127.0.0.1:9000/articles
  Sat, 11 May 2019 19:37:56 INFO run_main.py [line:40]  Request Body:
  Sat, 11 May 2019 19:37:56 INFO send_request.py [line:25]  ‘X-Token‘: ‘0a6db4e59c7fff2b2b94a297e2e5632e‘
  Sat, 11 May 2019 19:37:56 INFO check_result.py [line:16]  Begin to check result of  testcase.
  Sat, 11 May 2019 19:37:56 INFO check_result.py [line:22]  BS.200 is equal to BS.200
  Sat, 11 May 2019 19:37:56 INFO run_main.py [line:52]  Test case 查询文章 run sucess.
  Sat, 11 May 2019 19:37:56 INFO run_main.py [line:62]  Response is:
  "all_titles":
  "Hello": "alive",
  "amy1": "alive",
  "modifytest": "alive",
  "useasge of ddt": "alive"
  ,
  "msg": "query articles sucess.",
"status": "BS.200"
  
  Sat, 11 May 2019 19:37:56 INFO run_main.py [line:37]  Begin to run test case : 新增文章,case number :2.0
  Sat, 11 May 2019 19:37:56 INFO run_main.py [line:38]  Request method type is :POST
  Sat, 11 May 2019 19:37:56 INFO run_main.py [line:39]  Request URL:http://127.0.0.1:9000/articles/
  Sat, 11 May 2019 19:37:56 INFO run_main.py [line:40]  Request Body:
  "content": "useasge of ddt",
  "title": "useasge of ddt"
  
  Sat, 11 May 2019 19:37:56 INFO send_request.py [line:25]  ‘X-Token‘: ‘0a6db4e59c7fff2b2b94a297e2e5632e‘
  Sat, 11 May 2019 19:37:56 INFO check_result.py [line:16]  Begin to check result of  testcase.
  Sat, 11 May 2019 19:37:56 ERROR check_result.py [line:25]  BS.200 is not equal to BS.400
  Sat, 11 May 2019 19:37:56 ERROR run_main.py [line:60]  Test case 新增文章 run fail.
  Sat, 11 May 2019 19:37:56 INFO run_main.py [line:62]  Response is:
  "msg": "title aleady exist,fail to publish.",
  "status": "BS.400"
  
  Sat, 11 May 2019 19:37:56 INFO run_main.py [line:37]  Begin to run test case : 修改文章,case number :3.0
Sat, 11 May 2019 19:37:56 INFO run_main.py [line:38]  Request method type is :POST
  Sat, 11 May 2019 19:37:56 INFO run_main.py [line:39]  Request URL:http://127.0.0.1:9000/articles/7
  Sat, 11 May 2019 19:37:56 INFO run_main.py [line:40]  Request Body:
  "content": "modify test",
  "title": "modify test"
  
  Sat, 11 May 2019 19:37:56 INFO send_request.py [line:25]  ‘X-Token‘: ‘0a6db4e59c7fff2b2b94a297e2e5632e‘
  Sat, 11 May 2019 19:37:57 INFO check_result.py [line:16]  Begin to check result of  testcase.
  Sat, 11 May 2019 19:37:57 ERROR check_result.py [line:25]  BS.200 is not equal to BS.300
  Sat, 11 May 2019 19:37:57 ERROR run_main.py [line:60]  Test case 修改文章 run fail.
  Sat, 11 May 2019 19:37:57 INFO run_main.py [line:62]  Response is:
  "msg": "article is not exists,fail to modify.",
  "status": "BS.300"
  
  Sat, 11 May 2019 19:37:57 INFO run_main.py [line:37]  Begin to run test case : 删除文章,case number :4.0
  Sat, 11 May 2019 19:37:57 INFO run_main.py [line:38]  Request method type is :DELETE
  Sat, 11 May 2019 19:37:57 INFO run_main.py [line:39]  Request URL:http://127.0.0.1:9000/articles/7
  Sat, 11 May 2019 19:37:57 INFO run_main.py [line:40]  Request Body:
  Sat, 11 May 2019 19:37:57 INFO send_request.py [line:25]  ‘X-Token‘: ‘0a6db4e59c7fff2b2b94a297e2e5632e‘
  Sat, 11 May 2019 19:37:57 INFO check_result.py [line:16]  Begin to check result of  testcase.
  Sat, 11 May 2019 19:37:57 ERROR check_result.py [line:25]  BS.200 is not equal to BS.300
  Sat, 11 May 2019 19:37:57 ERROR run_main.py [line:60]  Test case 删除文章 run fail.
  Sat, 11 May 2019 19:37:57 INFO run_main.py [line:62]  Response is:
  "msg": "article is not exists,fail to delete.",
  "status": "BS.300"
  
  Sat, 11 May 2019 19:37:57 INFO run_main.py [line:74]  -----------------------------------------------------------
  Sat, 11 May 2019 19:37:57 INFO run_main.py [line:75]  本次一共运行:5 个用例
  Sat, 11 May 2019 19:37:57 INFO run_main.py [line:76]  本次运行通过:1 个用例
  Sat, 11 May 2019 19:37:57 INFO run_main.py [line:77]  本次运行跳过:1 个用例
  Sat, 11 May 2019 19:37:57 INFO run_main.py [line:78]  跳过的用例:[‘新增文章缺少title‘]
  Sat, 11 May 2019 19:37:57 INFO run_main.py [line:79]  -----------------------------------------------------------
11 、小结
  框架终于能跑起来了,但是遗留的问题还很多。
  很多地方的代码不够健壮,这个后面慢慢优化。还有用例校验支持的运算符比较少。
  发送邮件模块待完成。
  Headers的问题如何解决?
  如果请求的body比较多,写在Excel是不是很不美观呀?这个可以从固定地方读取文件来完成。
  Excel中测试用例有没有必填项呀?这个可以在运行结果之前进行校验,必填项缺少,不运行。
  最关键的一点,如果第二个用例依赖于第一个用例的返回,用例依赖一直是个痛点,下一篇解决。
  还有很多问题比如,重试机制,耗时的用例设置超时时间,超时默认为失败等等.......

接口自动化测试框架(java实现)(代码片段)

需求分析需求点需求分析通过yaml配置接口操作和用例后续新增接口和测试用例只需要编写yaml文件即可实现。可以支持接口间的参数传递具有参数依赖的接口可以进行变量的抽取和参数赋值。支持全局、用例维度的变量存储比如... 查看详情

unittest与数据驱动及测试框架设计模式(代码片段)

...过直接导入UnitTest包即可实现:importunittest是python库自带的自动化测试框架主要用于管理测试用例和实现数据驱动 在nuittest中所有的测试用例都是基于test_基于前缀来实现的如果不写的话那么它只是一个普通的函数unitest会自动... 查看详情

熬夜整理的自动化测试框架结构图,值的一看

自动化测试框架结构图目录自动化测试框架结构图1、接口自动化测试框架设计图2、接口自动化执行设计图3、API自动化平台框架设计图4、UI自动化测试框架设计图5、接口+UI自动化测试框架设计图6、Appium移动端自动化测试框架... 查看详情

api接口自动化测试框架搭建-详细设计&框架设计

...细分析,主要有下:功能说明使用Unittest框架开源自动化测试框架,直接使用批量或指定用例运行Unitt 查看详情

接口自动化测试选型-httprunner

...通用测试框架,只需编写维护一份YAML/JSON脚本,即可实现自动化测试、性能测试、线上监控、持续集成等多种测试需求。1.3  httprunner设计理念充分复用优秀的开源项目,不追求重复造轮子,而是将强大的轮子组装成战车... 查看详情

疫情期间的学习与收获

...高测试覆盖度(广度、深度)的方法思考与梳理2、接口自动化测试知识学习内容:(1)结合互联网资料及目前公司的接口自动化测试框架,学习接口自动化测试技术,测试用例设计等(2)可外网下载robot工具进行练习;(常见... 查看详情

如何基于yaml设计接口自动化测试框架?看完秒会(代码片段)

在设计自动化测试框架的时候,我们会经常将测试数据保存在外部的文件(如Excel、YAML、CSV)或者数据库中,实现脚本与数据解耦,方便后期维护。目前非常多的自动化测试框架采用通过Excel或者YAML文件直接... 查看详情

python3+requests搭建接口自动化测试框架(代码片段)

目录一、接口自动化的意义(为什么做这个框架)二、准备工作三、框架流程及逻辑四、各模块介绍五、具体使用一、接口自动化的意义(为什么做这个框架)      新版本上线时之前版本的功能需要进行回归... 查看详情

接口自动化测试-接口封装思想

目录一、接口测试封装思想二、测试框架三、架构管理一、接口测试封装思想  配置--根据配置文件获取初始配置和依赖  接口封装--1、封装接口调动进行抽象封装      --2、类似PageObject效果  业务流程--1、数据初... 查看详情

接口自动化测试-接口封装思想

目录一、接口测试封装思想二、测试框架三、架构管理一、接口测试封装思想  配置--根据配置文件获取初始配置和依赖  接口封装--1、封装接口调动进行抽象封装      --2、类似PageObject效果  业务流程--1、数据初... 查看详情

接口自动化--概述

最近接触了接口自动化,经过大约一个月的时间,利用工作之余,借助公司的项目,搭建了接口自动化框架(此框架是要实现脚本与数据的完全分离)。整个过程中,最重要的就是实现思路,思路有了,实现起来还是不困难的。... 查看详情

1-1接口自动化测试框架从设计到开发

...开发工程师,但是想成为测试开发工程师必须会一种接口自动化框架。必须从设计框架,开发框架,重构框架做起。要做到这些内容我们必须从以后这几个路线开始:1.接口基础(HTTP接口熟悉,常见接口介绍,接口测试工具的使... 查看详情

接口自动化艰辛之路---

...hapeL/p/9188495.html前言:上篇文章python3+requests+unittest:接口自动化测试(一):https://www.cnblogs.com/shapeL/p/9179484.html ,已经介绍了基于unittest框架的实现接口自动化,但是也存在一些问题,比如最明显的测试数据和业务没有区分... 查看详情

python+requests接口自动化测试框架实例详解教程

...//my.oschina.net/u/3041656/blog/820023摘要:python+requests实现的接口自动化框架详细教程前段时间由于公司测试方向的转型,由原来的web页面功能测试转变成接口测试,之前大多都是手工进行,利用postman和jmeter进行的接口测试,后来,组... 查看详情

python自动化教程jmeter性能测试

参考技术Apython自动化教程Jmeter性能测试25套高级软件测试,性能测试,功能测试,自动化测试,接口测试,移动端测试,手机测试,WEB测试,渗透测试,测试用例设计,黑盒测试,白盒测试,UFT高级测试,Android测试,Selenium3自... 查看详情

第三章,平台开发设计与实现

   在第二章中我们简单地介绍了接口自动化平台的基本功能,主要包括以下几个方面:(1)接口文档管理功能:管理接口信息,包括增,删,改,查等。(2)用例管理功能:新建,展示,查询,删除,运行测试用例... 查看详情

如何做好接口测试?

参考技术Asgbtmy:基于selenium的自动化框架开发,我主要是想问一下,你的框架除了前台的自动化,后台的数据的测试是否集成在你的测试框架中?小刀:你好,个人理解的你所说的后台的数据的测试是指的是对数据的校验,不知... 查看详情

appiumpo模式ui自动化测试框架——设计与实践(代码片段)

  (阅读目录)  1.目的  相信做过测试的同学都听说过自动化测试,而UI自动化无论何时对测试来说都是比较吸引人的存在。相较于接口自动化来说它可以最大程度的模拟真实用户的日常操作与特定业务场景的模拟,那么存在... 查看详情