关键词:
先了解了解Uploadify,具体内容如下
Uploadify是一个简单易用的多文件上传方案。作为一个Jquery插件,Uploadify使用简单,并具有高度的定制性。
Uploadify特性:
Uploadify简单说来,是基于Jquery的一款文件上传插件。它的功能特色总结如下:
1)、支持单文件或多文件上传,可控制并发上传的文件数
2)、在服务器端支持各种语言与之配合使用,诸如PHP,.NET,Java……
3)、通过参数可配置上传文件类型及大小限制
4)、通过参数可配置是否选择文件后自动上传
5)、易于扩展,可控制每一步骤的回调函数(onSelect, onCancel……)
6)、通过接口参数和CSS控制外观
7)、提供上传进度的事件回调,实时显示上传进度
8)、开始之前要先下载插件安装包到本地并引用,详细实现请看代码注释,下面开始代码。
1、html代码
|
1
2
3
4
5
6
7
8
9
10
11
12
13
14
15
16
17
18
19
20
21
22
23
24
25
26
27
28
29
30
31
32
33
34
35
36
37
38
|
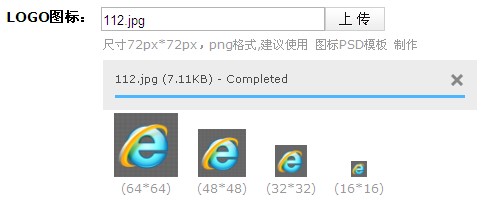
<div id="webApplogo_file" style="display: block; width: 800px; "> <ul> <li style="margin-left: 213px;"><span class="black_blod14">LOGO图标:</span></li> <li style="margin-left: 3px;"> <input type="text" readonly="readonly" id="text_webApplogo" name="app_logo" class="appipt1" value="<%=applogo %>" /></li> <li style="padding-top: 1px;"> <input type="file" id="webApplogo" name="webApplogo" /> </li> <li><span style="display: none; margin-left: 5px; padding-left: 20px; color: #EA5200; font-size: 12px; background: url(‘Images/icon_03.gif‘ ) no-repeat 0px 0px;" id="textporApplogo"> 请上传LOGO图标!</span></li> <li style="margin-left: 220px;"><span class="grey999" style="margin-left: 90px; float: left;"> 尺寸72px*72px,png格式,建议使用 图标PSD模板 制作</span> <div id="QID_webApplogo" class="fileQueue"></div> <table id="webApplogo_tab" width="50%" border="0" cellspacing="0" cellpadding="0" align="center" class="grey999" style="display: none; margin-left: 90px; float: left;"> <tr> <td align="center" valign="bottom"> <img style="width: 64px; height: 64px;" id="img_64" src="images/icon_02.gif" border="0" /><br /> (64*64) </td> <td align="center" valign="bottom"> <img style="width: 48px; height: 48px;" id="img_48" src="images/icon_02.gif" border="0" /><br /> (48*48) </td> <td align="center" valign="bottom"> <img style="width: 32px; height: 32px;" id="img_32" src="images/icon_02.gif" border="0" /><br /> (32*32) </td> <td align="center" valign="bottom"> <img style="width: 16px; height: 16px;" id="img_16" src="images/icon_02.gif" border="0" /><br /> (16*16) </td> </tr> </table> </li> </ul> </div> |
2、Javascript代码(关键部分)
|
1
2
3
4
5
6
7
8
9
10
11
12
13
14
15
16
17
18
19
20
21
22
23
24
25
26
27
28
29
30
31
32
33
34
35
36
37
38
39
40
41
42
43
44
|
$("#webApplogo").uploadify({ ‘uploader‘: ‘js/uploadify-v2.1.4/uploadify.swf‘,//进度条,Uploadify里面含有 ‘script‘: ‘UploadApplogo.ashx‘,//一般处理程序 ‘cancelImg‘: ‘js/uploadify-v2.1.4/cancel.png‘,//取消图片路径 ‘folder‘: ‘Imagelogo‘,//上传文件夹名 ‘auto‘: true, //文件添加到上传队列后,自动进行上传。默认为false ‘multi‘: false,//是否允许多文件上传。默认为false ‘fileExt‘:‘*.gif;*.jpg;*.jpeg;*.png‘,//允许上传的文件类型,使用分号(”;)”分割 例如:*.jpg;*.gif,默认为null(所有文件类型) ‘fileDesc‘:‘不超过2M的图片 (*.gif;*.jpg;*.png)‘, ‘sizeLimit‘: 2048000, //允许上传的文件大小(kb) 此为2M ‘onSelectOnce‘: function(event,data) { //在单文件或多文件上传时,选择文件时触发 //event 事件对象(the event object) //data 选择的操作信息 //data.filesSelected 选择文件操作中选中的文件数量 $(‘#status-message‘).text(data.filesSelected + ‘ 文件正在等待上传…….‘); }, ‘onComplete‘: function(event, queueID, fileObj, response, data) {//当单个文件上传完成后触发 //event:事件对象(the event object) //ID:该文件在文件队列中的唯一表示 //fileObj:选中文件的对象,他包含的属性列表 //response:服务器端返回的Response文本,我这里返回的是处理过的文件名称 //data:文件队列详细信息和文件上传的一般数据 alert("文件:" + fileObj.name + " 上传成功!"); //设置图片名称 $("#applogo").attr("value",response); //设置输入框的值 $("#text_webApplogo").attr("value",fileObj.name); //设置图片路径 $("#img_64").attr("src","Imagelogo/64_"+response); $("#img_48").attr("src","Imagelogo/48_"+response); $("#img_32").attr("src","Imagelogo/32_"+response); $("#img_16").attr("src","Imagelogo/16_"+response); //图片路径设置完成后,显示图片 $("#webApplogo_tab").css("display","block"); }, ‘onError‘: function(event, queueID, fileObj) {//当单个文件上传出错时触发 alert("文件:" + fileObj.name + " 上传失败!"); }, ‘buttonImg‘:‘Images/bn_04.gif‘,//浏览按钮的图片路径 ‘width‘:60,//浏览按钮的宽和高 ‘height‘:24 ,‘queueID‘:‘QID_webApplogo‘//页面上作为文件上传队列的元素的ID }); |
3、服务器端处理文件上传
|
1
2
3
4
5
6
7
8
9
10
11
12
13
14
15
16
17
18
19
20
21
22
23
24
25
26
27
28
29
30
31
32
33
34
35
36
37
38
39
40
41
42
43
44
45
46
47
48
49
50
51
52
53
54
55
56
57
58
59
60
61
62
63
64
65
66
67
68
69
70
71
72
73
74
75
76
77
78
79
80
81
82
83
84
85
86
87
88
89
90
91
92
93
94
95
|
/// <summary> /// 上传文件 /// </summary> public class UploadApplogo : IHttpHandler { System.Drawing.Image image, image64, image48, image32, image16; //定义image类的对象 protected string imagePath;//图片路径 protected string imageType;//图片类型 protected string imageName;//图片名称 protected string fileName;//图片名称 //提供一个回调方法,用于确定Image对象在执行生成缩略图操作时何时提前取消执行 //如果此方法确定 GetThumbnailImage 方法应提前停止执行,则返回 true;否则返回 false System.Drawing.Image.GetThumbnailImageAbort callb = null; public void ProcessRequest(HttpContext context) { context.Response.ContentType = "text/plain"; HttpPostedFile UploadImage = context.Request.Files["FileData"]; //物理路径 string uploadpath = HttpContext.Current.Server.MapPath(context.Request["folder"] + "\"); if (UploadImage != null) { //是否有目录,如没有就创建 if (!Directory.Exists(uploadpath)) { Directory.CreateDirectory(uploadpath); } //客户端文件完全名称 string filename = UploadImage.FileName; string extname = filename.Substring(filename.LastIndexOf(".") + 1); //为不重复,设置文件名 fileName = Guid.NewGuid().ToString() + "." + extname; //context.Response.Write("1"); context.Response.Write(fileName); } else { context.Response.Write("0"); } string mPath; imagePath = UploadImage.FileName; //取得图片类型 imageType = imagePath.Substring(imagePath.LastIndexOf(".") + 1); //取得图片名称 imageName = imagePath.Substring(imagePath.LastIndexOf("\") + 1); Stream imgStream = UploadImage.InputStream;//流文件,准备读取上载文件的内容 int imgLen = UploadImage.ContentLength;//上载文件大小 //建立虚拟路径 mPath = HttpContext.Current.Server.MapPath(context.Request["folder"]); //保存到虚拟路径 UploadImage.SaveAs(mPath + "\" + fileName); ////显示原图 //imageSource.ImageUrl = "upFile/" + imageName; //为上传的图片建立引用 image = System.Drawing.Image.FromFile(mPath + "\" + fileName); //生成缩略图 image64 = image.GetThumbnailImage(64, 64, callb, new System.IntPtr()); //把缩略图保存到指定的虚拟路径 image64.Save(HttpContext.Current.Server.MapPath(context.Request["folder"]) + "\64_" + fileName); //释放image64对象的资源 image64.Dispose(); //生成缩略图 image48 = image.GetThumbnailImage(48, 48, callb, new System.IntPtr()); image48.Save(HttpContext.Current.Server.MapPath(context.Request["folder"]) + "\48_" + fileName); image48.Dispose(); //生成缩略图 image32 = image.GetThumbnailImage(32, 32, callb, new System.IntPtr()); image32.Save(HttpContext.Current.Server.MapPath(context.Request["folder"]) + "\32_" + fileName); image32.Dispose(); //生成缩略图 image16 = image.GetThumbnailImage(16, 16, callb, new System.IntPtr()); image16.Save(HttpContext.Current.Server.MapPath(context.Request["folder"]) + "\16_" + fileName); image16.Dispose(); //释放image对象占用的资源 image.Dispose(); } public bool IsReusable { get { return false; } } } |
4、效果如下
更多精彩内容,请点击《jQuery上传操作汇总》,进行深入学习和研究。
以上就是本文的全部内容,希望对大家的学习有所帮助。
uploadify/uploadifive上传(中文文档)
...片上传的插件,有基于Flash和HTML5两种版本。 Uploadify/uploadifive主要特点有:1.多文件上传2.个性化设置3.上传进度条显示4.拖拽上传(HTML5版本)官网:http://www.uploadify.comhttp://www.uploadify.com/documentation/ 案例讲 查看详情
jquery无刷新上传插件uploadify的上传按钮不显示
使用的免费的flash版本,电脑也有flashplayer的9.0.24版本以上在浏览器上传按钮不能正常显示,这是 因为浏览器禁止了flash,需要开启flash,例:使用的谷歌浏览器 未开启flash 是这个样子,需要开启flash 下面是一个方... 查看详情
关于jquery文件上传插件 uploadify 3.1的使用
要使用uplaodify3.1,自然要下载相应的包,下载地址http://www.uploadify.com/download/,这里有两种包,一个是基于flash,免费的,一个是基于html5,需要付费,我这里所说的也是前一种。当然现在可能已经不再是3.1版本了,估计是3.2了。不... 查看详情
文件上传利器jquery上传插件uploadify
在做日常项目中,经常在后台需要上传图片等资源文件,之前使用过几次这个组件,感觉非常好用,但是每次使用的时候都是需要经过一番查阅,所以还不如记住在这里,以后使用的时候就翻翻。他的官方网站如下:http://www.uplo... 查看详情
jquery文件上传控件uploadify
http://www.cnblogs.com/mofish/archive/2012/11/30/2796698.html 基于jquery的文件上传控件,支持ajax无刷新上传,多个文件同时上传,上传进行进度显示,删除已上传文件。要求使用jquery1.4或以上版本,flashplayer9.0.24以上。有两个版本,一个... 查看详情
jquery无刷新上传之uploadify简单试用
先简单的侃两句:貌似已经有两个月的时间没有写过文章了,不过仍会像以前那样每天至少有一至两个小时是泡在园子里看各位大神的文章。前些天在研究“ajax无刷新上传”方面的一些插件,用SWFUpload实现了无刷新上传的功能... 查看详情
jquery文件上传控件uploadify
(转自http://www.cnblogs.com/mofish/archive/2012/11/30/2796698.html)基于jquery的文件上传控件,支持ajax无刷新上传,多个文件同时上传,上传进行进度显示,删除已上传文件。要求使用jquery1.4或以上版本,flashplayer9.0.24以上。有两个版本,一个... 查看详情
基于yaf框架和uploadify插件,做的一个导入excel文件,查看并保存数据的功能
思路: 1.首先,页面前端,上传附件,提交给后台,并带一个随机性的参数(可以用时间戳); 2.后端接收附件,做一系列的逻辑处理,无误后,将对应的文件存储在上传的目录下; 3.然后... 查看详情
java版-jquery上传插件uploadify使用实例
摘自:http://itindex.net/detail/47160-java-jquery-%E4%B8%8A%E4%BC%A0运行效果:包结构图: 后台JAVA逻辑:packagecom.bijian.study;importjava.io.File;importjava.io.IOException;importjava.util.Iterator;importjava 查看详情
tp5使用uploadify插件做上传
uploadify插件地址推荐使用flash版本插件引入<scriptsrc="../jquery.js"></script><scriptsrc="../jquery.uploadify.min.js"></script><scripttype="text/javascript"&g 查看详情
uploadify插件火狐上传图片显示302,或者是io,
我用的是tp框架,在用uploadify上传图片时,IE谷歌都可以,火狐下提示302,试了很多方法,比如?;jsessionid="+"<%=request.getSession().getId()%>都是不行的.有时候提示IO错误,我在.htaccess里面加<IfModulemod_security.c>#禁止对POST数据进行安全扫... 查看详情
基于jquery或zepto实现实时监控用户浏览信息
...决方案了:1.首先要监控用户到底在该屏停留了多久;2.基于1确定用户是停留在了本页面而没有滑动手机屏幕;3.在用户未达到条件后的callback机制。基于以上的问题,我们可以想到时间分片 1/*Thisisaexposeadvertisement 查看详情
angularjs使用uploadify插件的问题总结
AngularJS使用uploadify的过程中遇到了两个问题,总结如下: 某个页面需要同时实例化多个uploadify组件时,出现“IDSWFUpload_0isalreadyinuse.TheFlashObjectcouldnotbeadded”的错误,分析jquery.uploadify.js代码发现,是由于是实例化SWFUload时... 查看详情
Uploadify 插件不调用 Java Servlet
】Uploadify插件不调用JavaServlet【英文标题】:Uploadifyplugindoesn\'tcallJavaServlet【发布时间】:2011-01-1708:20:24【问题描述】:我刚开始使用Uploadifyflash插件而不是标准HTMLUI。并遇到了下一个问题:当我单击“上传文件”链接时,会显示... 查看详情
jquery插件和css3怎么用在wordpress上面
...数据的jQueryhighcharts图表插件 今天我们要来分享一款基于jQuery的highcharts实时图表插件,highcharts图表插件定义了每隔一秒钟更新数据,然后根据每个数据点绘制一条折线,随着数据的更新,折线也就会不停的向前移动,形成一... 查看详情
如何实现定位背景滚动/显示效果? jQuery插件可用吗?
】如何实现定位背景滚动/显示效果?jQuery插件可用吗?【英文标题】:Howtoachievefixedpositionbackgroundscroll/revealeffect?jQuerypluginavailable?【发布时间】:2012-08-2821:49:26【问题描述】:我想知道是否有人知道是否有jquery插件,或者如何实... 查看详情
jquery实现无刷新显示页面内容
一个页面分左右两部分,左边是导航板块,右边是显示模块,我想实现的是点击左边的导航按钮在右边就能添加一个tab页面显示,点击多个后,各个tab排到一列,这个用jquery能实现吗???具体怎么实现的?原则上你可以用iframe... 查看详情
用于动态实时事件的 Tipsy jquery 插件不起作用
】用于动态实时事件的Tipsyjquery插件不起作用【英文标题】:Tipsyjquerypluginfordynamicliveeventsisnotworking【发布时间】:2011-12-1301:28:48【问题描述】:我正在使用thetipsyjqueryplugin为动态显示的元素创建工具提示。工具提示适用于非动态... 查看详情