关键词:
1.配置 RHCS 集群的前提:
时间同步
名称解析,这里使用修改/etc/hosts 文件
配置好 yum 源,CentOS 6 的默认的就行
关闭防火墙(或者开放集群所需通信端口),和selinux,
关闭 NetworkManager 服务
2. RHCS 所需要的主要软件包为 cman 和 rgmanager
cman: 是集群基础信息层,在 CentOS 6中依赖 corosync
rgmanager: 是集群资源管理器, 类似于pacemaker 的功能
luci: 提供了管理 rhcs 集群的 web 界面, luci 管理集群主要是通过跟 ricci 通信来完成的。
ricci: 安装在集群的节点的接收来自 luci 管理请求的代理。
luci 跟 ricci 的关系就好像 ambari-server 跟 ambari-agent 一样。
3.环境说明:
luci : 192.168.6.31  cent1.test.com
ricci: 192.168.6.32  cent2.test.com
ricci: 192.168.6.33  cent3.test.com
ricci: 192.168.6.34  cent4.test.com
我这里已经配好了主机名了,但是其他的如时间同步,配置/etc/hosts/ 等都没执行,为了方便,所以写了个 playbook 来进行初始化一下
---
- hosts:hdpservers
  remote_user: root
  vars:
  tasks:
  - name: add synctime cron
    cron: name=‘sync time‘ minute=‘*/5‘job=‘/usr/sbin/ntpdate 192.168.6.31‘
  - name: shutdown iptables
    service: name={{item.name}}state={{item.state}} enabled={{item.enabled}}
    with_items:
    - { name: iptables, state: stopped,enabled: no}
    - { name: NetworkManager, state: stopped,enabled: no}
    tags: stop service
  - name: copy selinux conf file
    copy: src={{item.src}} dest={{item.dest}}owner={{item.owner}} group={{item.group}} mode={{item.mode}}
    with_items:
    - { src=‘#‘" /etc/selinux/config, dest:/etc/selinux/config, owner: root, group: root, mode: ‘0644‘}
    - { src=‘#‘" /etc/hosts, dest: /etc/hosts,owner: root, group: root, mode: ‘0644‘}
  - name: cmd off selinux
    shell: setenforce 0
执行这个 playbook,进行初始化
[[email protected] yaml]#ansible-playbook base.yml
4.在 cent1 上安装 luci, luci 是一个 python 程序,依赖很多python包
[[email protected] ~]#yum install luci
启动 luci
[[email protected] ~]#/etc/init.d/luci start
Adding followingauto-detected host IDs (IP addresses/domain names), corresponding to `cent3‘address, to the configuration of self-managed certificate`/var/lib/luci/etc/cacert.config‘ (you can change them by editing`/var/lib/luci/etc/cacert.config‘, removing the generated certificate`/var/lib/luci/certs/host.pem‘ and restarting luci):
         (none suitable found, you can still doit manually as mentioned above)

Generating a 2048bit RSA private key
writing newprivate key to ‘/var/lib/luci/certs/host.pem‘
正在启动saslauthd:                                       [确定]
Start luci...                                              [确定]
Point your webbrowser to https://cent1.hfln.com:8084 (or equivalent) to access luci
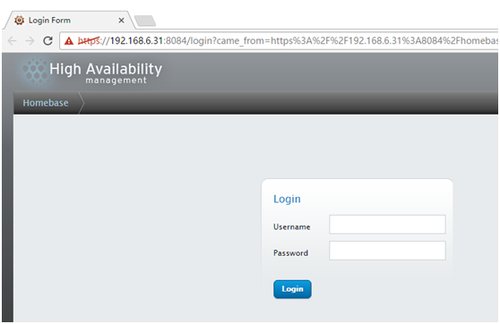
现在可以在前台登录luci 了,看清是 https 哦
账号密码就是这台主机的账号和密码
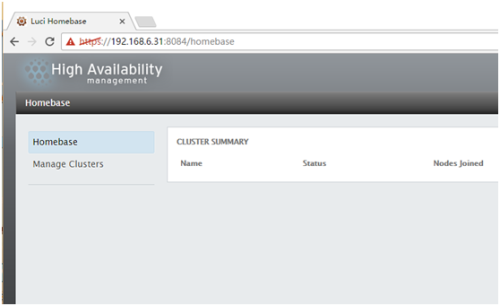
登录成功啦,现在来配置 rhcs 的集群,这个只是用来管理集群的,真正的集群还没开始装呢。
5.在 cnet2, cent3, cent4 中安装 ricci, ricci 也依赖很多软件,这里使用 ansible 直接在三个节点上装, 当然我已经配好了 cent1 到 其他节点的免密钥登录了
[[email protected] ~]#ansible rhcs -m yum -a "name=ricci"
装好ricci 之后还要在 node 节点上给 ricci 用户设置密码,ricci用户就是运行 ricci进程的用户,这个密码一会要用,这里就简单粗暴了,这个密码还可以用 ccs命令来进行设置
[[email protected] ~]#ansible rhcs -m shell -a "echo ‘123456‘ | passwd --stdin ricci"
启动 ricci
[[email protected] ~]#ansible rhcs -m service -a "name=ricci state=started enabled=yes"
[[email protected] ~]# ss-tunlp |grep ricci
tcp    LISTEN    0      5                     :::11111                :::*      users:(("ricci",3237,3))
ricci 监听在 11111 端口,像这种操作当然也是可以写到 playbook 当中的
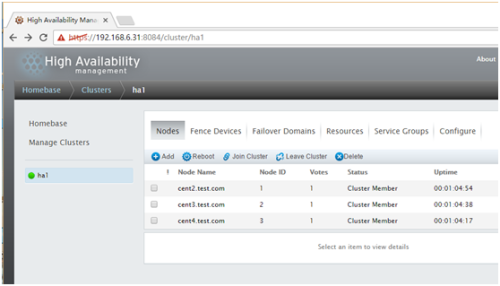
6. 现在可以在web 界面上配置集群了,比如创建/添加/删除一个集群,管理node, resource, fence device, servicegroups, Failover Domains 等等集群的全生命周期都可以在这里完成。
这里演示一个关于 web服务的高可用服务
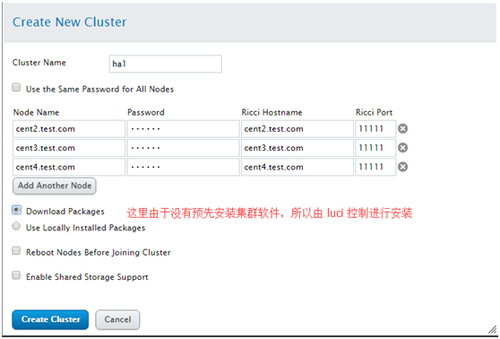
Manage Clusters--> Create 是创建一个集群
这个界面还算简单吧;
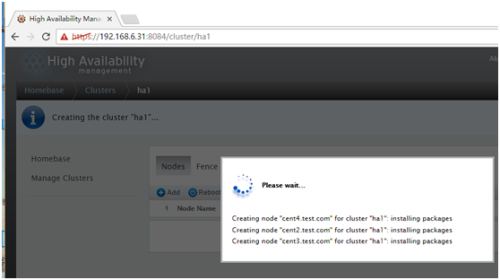
Create Cluster 之后,那么就开始尝试安装集群软件了.
在任意一个node上可以看到 ricci 的工作进程:
[[email protected] ~]# psaux |grep ricci
ricci     3453 0.1  0.4 213664  4400 ?       S<s  17:18   0:00 ricci -u ricci
ricci     3489 0.0  0.1  54912 1908 ?        S<s  17:22  0:00 /usr/libexec/ricci/ricci-worker -f /var/lib/ricci/queue/1500004777
root      3490 0.2  0.5  48552 5136 ?        S    17:22   0:00 ricci-modrpm
root      3567 0.0  0.0 103252   880 pts/0   S+   17:24   0:00 grep ricci
/var/lib/ricci/queue/目录下存放的是 luci 发给 ricci 的任务文件,是 XML 格式的
[[email protected] ~]#file /var/lib/ricci/queue/1500004777
/var/lib/ricci/queue/1500004777:XML  document text
7. 安装成功了
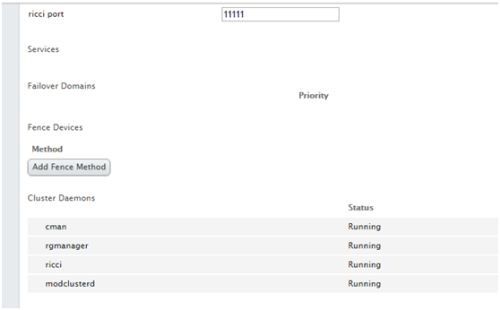
可以点任何一个node 进去看看
如果这底下的服务没启动的话,可以尝试手动起一下,一般来说是OK的。
8.添加资源
这里没有 fence 设备,不关注这个,添加两个公共资源,并添加一个服务,然后来启动服务
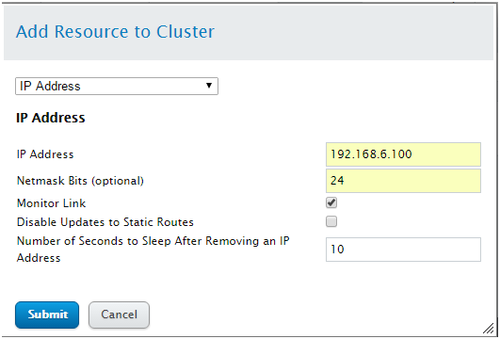
Resources -->Add : 添加一个资源
添加一个虚拟IP,这里的 mask 要写成上面这样,不能写成 255.255.255.0 这种,否则会导致无法添加IP
rgmanager Startingstopped service service:web1
rgmanager start onip "192.168.6.100/255.255.255.0" returned 1 (generic error)
rgmanager #68:Failed to start service:web1; return value: 1
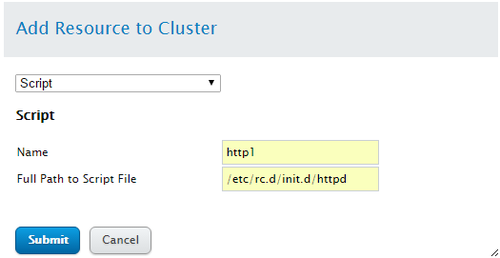
再添加一个script资源
9.添加 Service
这里的资源是共公的,假如这个集群内有多个服务,那么都可以使用这些资源,也可以在
Service Groups 里添加一个私有的资源。
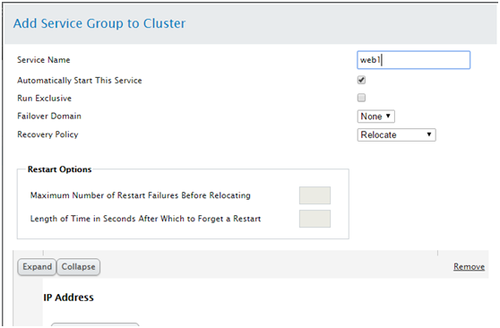
现在添加一个Service:
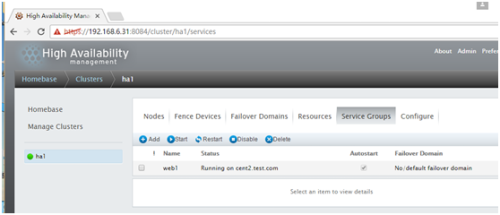
Service Groups--> Add : 添加一个 Service,
Add Resource 将刚才建立的两个资源添加进来;
现在在集群的节点上用命令查看一下,集群内的任何节点都可以
[[email protected] ~]#clustat
Cluster Status forha1 @ Sun Jan  8 17:47:40 2017
Member Status:Quorate

 Member Name                                                     ID  Status
 ------ ----                                                    ---- ------
 cent2.test.com                                                     1 Online, rgmanager
 cent3.test.com                                                     2 Online, Local, rgmanager
 cent4.test.com                                                     3 Online, rgmanager

 Service Name                                              Owner (Last)                                              State
 ------- ----                                              ----- ------                                              -----
 service:web1                                              cent2.test.com                                            started
在 cent2 上 ip 和httpd 服务都已经起来了
[[email protected] ~]# ipa
1: lo:<LOOPBACK,UP,LOWER_UP> mtu 65536 qdisc noqueue state UNKNOWN
    link/loopback 00:00:00:00:00:00 brd00:00:00:00:00:00
    inet 127.0.0.1/8 scope host lo
    inet6 ::1/128 scope host
       valid_lft forever preferred_lft forever
2: eth0:<BROADCAST,MULTICAST,UP,LOWER_UP> mtu 1500 qdisc pfifo_fast state UP qlen1000
    link/ether 00:0c:29:91:b3:11 brdff:ff:ff:ff:ff:ff
    inet 192.168.6.32/24 brd 192.168.6.255scope global eth0
    inet 192.168.6.100/24 scope global secondaryeth0
    inet6 fe80::20c:29ff:fe91:b311/64 scopelink
       valid_lft forever preferred_lft forever
[[email protected] ~]#netstat -tunlp |grep 80
tcp        0     0 :::80                      :::*                        LISTEN      34901/httpd
10.测试故障转移:
关于 rhcs 中 service 的健康状态检测, 可以通过 /var/log/cluster/rgmanager.log 日志来查看
Jan 08 18:56:59rgmanager [ip] Checking 192.168.6.100/24, Level 10
Jan 08 18:56:59rgmanager [ip] 192.168.6.100/24 present on eth0
Jan 08 18:56:59rgmanager [ip] Link for eth0: Detected
Jan 08 18:56:59rgmanager [ip] Link detected on eth0
Jan 08 18:56:59rgmanager [ip] Local ping to 192.168.6.100 succeeded
这里可以看到他会尝试查看和 ping 192.168.6.100 ,这是针对 IP 资源的检测方式
Jan 08 18:55:49rgmanager [script] Executing /etc/rc.d/init.d/httpd status
上面是 script 资源的检测方式则是仅仅去用脚本来执行 status 参数。
在我尝试将/etc/init.d/httpd/ stop 后,日志出现了如下:
Jan 08 18:56:59rgmanager [script] Executing /etc/rc.d/init.d/httpd status
Jan 08 18:56:59rgmanager [script] script:http1: status of /etc/rc.d/init.d/httpd failed(returned 3)
# 这里发现检测失败了
Jan 08 18:56:59rgmanager status on script "http1" returned 1 (generic error)
Jan 08 18:56:59rgmanager Stopping service service:web1
Jan 08 18:56:59rgmanager [script] Executing /etc/rc.d/init.d/httpd stop
Jan 08 18:56:59rgmanager [ip] Removing IPv4 address 192.168.6.100/24 from eth0
# 以上几步在这个节点停止了 web1 服务
Jan 08 18:57:09rgmanager Service service:web1 is recovering
Jan 08 18:57:14rgmanager Service service:web1 is now running on member 2
# 将web1 服务在 member 2 上恢复了,member 2 也就是 cent3.test.com
如果这种 script 的资源不符合你的需求,那么可以尝试 apache 资源。即使你认为这种 script 的资源检查方式过于简单,也可以在脚本里添加功能来达到你的目的。
本文出自 “海风久远” 博客,请务必保留此出处http://beyondhf.blog.51cto.com/8953234/1890192
yum 在 CentOS 6.6 上哪里安装 python?
】yum在CentOS6.6上哪里安装python?【英文标题】:WheredoesyuminstallpythononCentOS6.6?【发布时间】:2016-10-1110:21:08【问题描述】:我已经使用这个命令在我的CentOS6.6系统上安装了python27:%yuminstallpython27安装成功,但我找不到python27可执行... 查看详情
centos6.6安装winexe
由于自己项目的需要winexe,网上搜winexe的资料少之又少。所以就在此记录我的整个过程,有不对的地方还请指出,谢谢! //本文中使用的版本是:winexe-1.00 1.Wine介绍Wine是什么?!wiki的解释比较权威,摘要如下: ... 查看详情
centos6.6安装图解
centOS6.6安装图解操作系统:CentOS6.664位IP地址:192.168.1.131网关:192.168.1.1DNS:192.168.1.1114.114.114.114备注:CentOS6.6系统镜像有32位和64位两个版本,这里提供DVD版的。4G内存以上使用x86_64位的系统。附:CentOS6.6下载地址32位DVD版本:http... 查看详情
centos6.6安装图解
centOS6.6安装图解操作系统:CentOS6.664位IP地址:192.168.1.31网关:192.168.1.1DNS:192.168.1.1114.114.114.114备注:CentOS6.6系统镜像有32位和64位两个版本,这里提供DVD版的。4G内存以上使用x86_64位的系统。附:CentOS6.6下载地址32位DVD版本:http:... 查看详情
关于centos6.6无法使用yum安装软件
关于Centos6.6无法使用yum安装软件2020年11月30日起centos删除了6版本的yum源,你们老师应该没有意识到这一点你有两个选择:1:用老师给的资源包手动安装,我不建议你这么做,因为你不一定能在今年春节前完成... 查看详情
centos6.6使用yum安装zabbix3.4
环境Mysql:mariadb10.2Php:5.6Httpd:2.2System:centos6.6x86_64Zabbix:3.4 yuminstall–yepel-releaseyumgroupinstall–y“developmenttools”useradd–r–s/sbin/nologinwww 安装mysql建立一个yum仓库,内容如下:catmariadb10. 查看详情
centos6安装
话不多说,直接VM上安装CentOS6.6。是否检测磁盘的完好性,选跳过。650)this.width=650;"src="https://s3.51cto.com/wyfs02/M00/91/6C/wKioL1j143mCLcieAADF17t_xd0999.png"style="float:none;"title="CentOS6.6安装规范16.png"alt="wKioL1j143mCLc 查看详情
centos6.6中jdk1.6的安装和配置方法
Linux中JDK1.6的安装和配置方法 一、安装创建安装目录,在/usr/java下建立安装路径,并将文件考到该路径下: #mkdir/usr/java 1、jdk-6u11-linux-i586.bin 这个是自解压的文件,在linux上安装如下: #chmod755jdk-6u11-linux-i586.bin... 查看详情
yum 在 CentOS 6.6 上安装 texinfo(无软件包)
】yum在CentOS6.6上安装texinfo(无软件包)【英文标题】:yuminstalltexinfoonCentOS6.6(nopackage)【发布时间】:2018-09-1601:21:26【问题描述】:为了解决对我的某个程序的一些依赖,我必须在我的centos6.6系统上安装texinfoyuminstalltexinfo结果Setti... 查看详情
centos6.6使用sendmail备份日志发送邮件
一、环境描述[[email protected] ~]# head -n1 /etc/issueCentOS release 6.6 (Final)[[email protected] ~]#二、安装步骤1.安装sendmail服务器[[email protected] ~]#& 查看详情
centos6.6_64安装截图
CentOS6.6_64安装截图Steps1用光盘成功引导系统,会出现下面的界面。 界面说明:Installorupgradeanexistingsystem安装或升级现有的系统installsystemwithbasicvideodriver安装过程中采用基本的显卡驱动Rescueinstalledsystem进入系统修复模式Bootfromlo... 查看详情
centos6.6安装之后调优
Centos6.6安装后优化方案转至元数据结尾650)this.width=650;"src="http://172.16.2.100/download/resources/com.atlassian.confluence.plugins.confluence-page-banner:page-banner-resources/images/grey_attach.png"height="16"w 查看详情
centos6.6虚拟机的创建与系统安装
在VM中创建虚拟机 因为我们在学习和实验当中在虚拟机中完成,所以在安装操作系统之前我们要创建一个虚拟机,方法如下: ★打开虚拟机,选择新建虚拟机或者是点击文件--à新建虚拟机,如下图... 查看详情
centos6.6安装node.js
node.js的GitHub地址是:https://github.com/nodejs/node官网源码包下载地址时:https://nodejs.org/en/download/ ①获取并编译源码(已经安装了git)gitclonehttps://github.com/nodejs/node.gitcdnodegitcheckout 编译:./configure在编译的时候出 查看详情
centos6.6安装选包及基础场景说明
d 查看详情
centos6.6上进程挂起的诡异问题和处理
...的服务器不再支持CentOS5.4系统了,我们在新装机器上安装CentOS6.6。随着CentOS6.6机器的增多,我们逐渐注意到一个诡异问题:运行在这些机器上的某些进程,容易莫名其妙地挂起(举个例子,mysql可以连上,但命令收不到响应),... 查看详情
centos6.6下目录结构及其主要作用
今天我们总结一下Centos6.6的linux的目录结构,一个系统的目录众多,这里我们主要认识一下,根目录下的主要目录,首先我们可以通过tree命令查看一次根目录下一层目录都有什么目录,补充:... 查看详情
centos6.6中安装cmake时出现无c++程序可关联
我已安装gccgcc-c++makeautomake等软件[root@localhostcmake-3.1.1]#./configure---------------------------------------------CMake3.1.1,Copyright2000-2015Kitware,Inc.Ccompileronthissystemis:cc---------------------------------------------ErrorwhenbootstrappingCMake:CannotfindappropriateC++compilero... 查看详情
