关键词:
一. 概念说明
Broker:简单来说就是消息队列服务器实体。
Exchange:消息交换机,它指定消息按什么规则,路由到哪个队列。
Queue:消息队列载体,每个消息都会被投入到一个或多个队列。
Binding:绑定,它的作用就是把exchange和queue按照路由规则绑定起来。
Routing Key:路由关键字,exchange根据这个关键字进行消息投递。
vhost:虚拟主机,一个broker里可以开设多个vhost,用作不同用户的权限分离。
producer:消息生产者,就是投递消息的程序。
consumer:消息消费者,就是接受消息的程序。
channel:消息通道,在客户端的每个连接里,可建立多个channel,每个channel代表一个会话任务。交换机路由的几种类型:
Direct Exchange:直接匹配,通过Exchange名称+RountingKey来发送与接收消息.
Fanout Exchange:广播订阅,向所有的消费者发布消息,但是只有消费者将队列绑定到该路由器才能收到消息,忽略Routing Key.
Topic Exchange:主题匹配订阅,这里的主题指的是RoutingKey,RoutingKey可以采用通配符,如:*或#,RoutingKey命名采用.来分隔多个词,只有消息这将队列绑定到该路由器且指定RoutingKey符合匹配规则时才能收到消息;
Headers Exchange:消息头订阅,消息发布前,为消息定义一个或多个键值对的消息头,然后消费者接收消息同时需要定义类似的键值对请求头:(如:x-mactch=all或者x_match=any),只有请求头与消息头匹配,才能接收消息,忽略RoutingKey.
默认的exchange:如果用空字符串去声明一个exchange,那么系统就会使用”amq.direct”这个exchange,我们创建一个queue时,默认的都会有一个和新建queue同名的routingKey绑定到这个默认的exchange上去
二、环境配置
项目基本配置参考SpringBoot入门一,使用myEclipse新建一个SpringBoot项目,使用myEclipse新建一个SpringBoot项目即可。下面开始Rabbitmq整合
2.1 pom.xml添加以下配置信息
<!-- 引入RabbitMq支持 -->
<dependency>
        <groupId>org.springframework.boot</groupId>
        <artifactId>spring-boot-starter-amqp</artifactId>
</dependency>
2.2 配置文件中添加以下配置信息
# RabbitMq配置
spring.rabbitmq.host=127.0.0.1
## spring.rabbitmq.port=
spring.rabbitmq.username=test
spring.rabbitmq.password=56789
## 消息发送确认(用来确认生产者将消息发送给交换器,交换器传递给队列的过程中,消息是否成功投递)
spring.rabbitmq.publisher-confirms=true
## 消息发送失败退回(消息投递失败时触发)
spring.rabbitmq.publisher-returns=true
## 消息接收确认,采用手动应答(none 不确认;auto 自动确认;manual 手动确认)
spring.rabbitmq.listener.simple.acknowledge-mode=manual
## 并发消费数量
spring.rabbitmq.listener.simple.concurrency=5
## 最大并发消费数量
spring.rabbitmq.listener.simple.max-concurrency=10
2.3 编写RabbitMq配置类
import org.springframework.amqp.core.Binding;
import org.springframework.amqp.core.BindingBuilder;
import org.springframework.amqp.core.DirectExchange;
import org.springframework.amqp.core.FanoutExchange;
import org.springframework.amqp.core.Queue;
import org.springframework.amqp.core.TopicExchange;
import org.springframework.context.annotation.Bean;
import org.springframework.context.annotation.Configuration;

@Configuration
public class RabbitMqConfig {

    // =====================普通队列模式,指定Queue名称发送======================
    /**
     * <h5>功能:构建队列,名称,是否持久化</h5>
     * @return
     */
    @Bean
    public Queue springbootQueueTest01(){
        // durable:是否持久化
        return new Queue("springboot.Queue.01", true);
    }

    /**
     * <h5>功能:构建队列,名称,是否持久化</h5>
     * @return
     */
    @Bean
    public Queue springbootQueueTest02(){
        // durable:是否持久化
        return new Queue("springboot.Queue.02", true);
    }

    /**
     * <h5>功能:直连模式交换机</h5>
     * 用于实例间的任务分发
     * 是一种带路由功能的交换机,一个队列会和一个交换机绑定,除此之外再绑定一个routing_key
     * @return
     */
    @Bean
    public DirectExchange directExchange(){
        // durable:是否持久化;auto_delete:当所有消费客户端连接断开后,是否自动删除队列;
        return new DirectExchange("springboot.DirectExchange", true, false);
    }

    /**
     * <h5>功能:队列和直连交换机绑定</h5>
     * @param springbootQueueTest01
     * @param directExchange
     * @return
     */
    @Bean
    public Binding binding01(Queue springbootQueueTest01, DirectExchange directExchange){
        return BindingBuilder.bind(springbootQueueTest01).to(directExchange).with("springboot.bindingkey.01");
    }

    /**
     * <h5>功能:队列和直连交换机绑定</h5>
     * @param springbootQueueTest02
     * @param directExchange
     * @return
     */
    @Bean
    public Binding binding02(Queue springbootQueueTest02, DirectExchange directExchange){
        return BindingBuilder.bind(springbootQueueTest02).to(directExchange).with("springboot.bindingkey.02");
    }

    // =====================topic 主题匹配订阅模式,匹配模式发送======================
    /**
     * <h5>功能:构建队列,名称,是否持久化</h5>
     * @return
     */
    @Bean
    public Queue springbootQueueTest03(){
        // durable:是否持久化
        return new Queue("springboot.Queue.03", true);
    }

    /**
     * <h5>功能:构建队列,名称,是否持久化</h5>
     * @return
     */
    @Bean
    public Queue springbootQueueTest04(){
        // durable:是否持久化
        return new Queue("springboot.Queue.04", true);
    }

    /**
     * <h5>功能:主题匹配订阅模式交换机</h5>
     * 通过可配置的规则分发给绑定在该exchange上的队列
     * 发送到主题交换机上的消息需要携带指定规则的routing_key
     * 交换机和队列的binding_key需要采用*.#.*.....的格式,每个部分用.分开
     * *表示一个单词
     * #表示任意数量(零个或多个)单词
     * @return
     */
    @Bean
    public TopicExchange topicExchange(){
        // durable:是否持久化;auto_delete:当所有消费客户端连接断开后,是否自动删除队列;
        return new TopicExchange("springboot.TopicExchange", true, false);
    }

    /**
     * <h5>功能:队列和主题匹配订阅交换机绑定</h5>
     * @param springbootQueueTest03
     * @param topicExchange
     * @return
     */
    @Bean
    public Binding binding03(Queue springbootQueueTest03, TopicExchange topicExchange){
        return BindingBuilder.bind(springbootQueueTest03).to(topicExchange).with("springboot.topic.01");
    }

    // *(星号)仅代表一个单词;#(井号)代表任意个单词
    /**
     * <h5>功能:队列和主题匹配订阅交换机绑定</h5>
     * @param springbootQueueTest04
     * @param topicExchange
     * @return
     */
    @Bean
    public Binding binding04(Queue springbootQueueTest04, TopicExchange topicExchange){
        return BindingBuilder.bind(springbootQueueTest04).to(topicExchange).with("springboot.topic.#");
    }

    // ===============fanout广播模式 队列模式,只要绑定了Queue就全部发送(瞅谁谁怀孕)===============
    /**
     * <h5>功能:广播模式交换机</h5>
     * 分发给所有绑定到该exchange上的队列,忽略routing key
     * 速度是所有的交换机类型里面最快的
     * @return
     */
    @Bean
    public FanoutExchange fanoutExchange(){
        // durable:是否持久化;auto_delete:当所有消费客户端连接断开后,是否自动删除队列;
        return new FanoutExchange("springboot.fanoutExchange", true, false);
    }

    // springbootQueueTest01中有模拟消费异常,重新发送消息到队列的处理,广播模式下会形成死循环,因此广播模式下不要绑定有消息重发送处理的Queue
//  @Bean
//  public Binding binding05(Queue springbootQueueTest01, FanoutExchange fanoutExchange){
//      return BindingBuilder.bind(springbootQueueTest01).to(fanoutExchange);
//  }

    /**
     * <h5>功能:队列和广播模式交换机绑定</h5>
     * @param springbootQueueTest02
     * @param fanoutExchange
     * @return
     */
    @Bean
    public Binding binding06(Queue springbootQueueTest02, FanoutExchange fanoutExchange){
        return BindingBuilder.bind(springbootQueueTest02).to(fanoutExchange);
    }

    /**
     * <h5>功能:队列和广播模式交换机绑定</h5>
     * @param springbootQueueTest03
     * @param fanoutExchange
     * @return
     */
    @Bean
    public Binding binding07(Queue springbootQueueTest03, FanoutExchange fanoutExchange){
        return BindingBuilder.bind(springbootQueueTest03).to(fanoutExchange);
    }

    /**
     * <h5>功能:队列和广播模式交换机绑定</h5>
     * @param springbootQueueTest04
     * @param fanoutExchange
     * @return
     */
    @Bean
    public Binding binding08(Queue springbootQueueTest04, FanoutExchange fanoutExchange){
        return BindingBuilder.bind(springbootQueueTest04).to(fanoutExchange);
    }
}
2.4 编写生产者类(可以把所有的send类都整合在一个类中,这里只做演示,就不整合了)
RabbitMqSend01.java(普通模式)
import javax.annotation.PostConstruct;
import org.slf4j.Logger;
import org.slf4j.LoggerFactory;
import org.springframework.amqp.core.Message;
import org.springframework.amqp.rabbit.core.RabbitTemplate;
import org.springframework.amqp.rabbit.support.CorrelationData;
import org.springframework.beans.factory.annotation.Autowired;
import org.springframework.stereotype.Service;
// 如果有多个send类,只需要在其中一个类实现以下接口和对应的方法即可,其他类自动生效
@Service
public class RabbitMqSend01 implements RabbitTemplate.ConfirmCallback,RabbitTemplate.ReturnCallback {
private final Logger log = LoggerFactory.getLogger(this.getClass());
@Autowired
private RabbitTemplate rabbitTemplate;
// 表示在类加载完毕之后执行
@PostConstruct
public void init() {
rabbitTemplate.setConfirmCallback(this);
rabbitTemplate.setReturnCallback(this);
}
public void send(String str){
rabbitTemplate.convertAndSend("springboot.Queue.01", str);
}
// ReturnCallback接口用于实现消息发送到RabbitMQ交换器,但无相应队列与交换器绑定时的回调(既发送到Queue失败时回调)
@Override
public void returnedMessage(Message message, int i, String s,String s1, String queueName) {
System.out.println("发送信息到队列(Queue)"+queueName+"失败" + message.toString()+"===["+i+"]===["+s+"]===["+s1+"]==="+queueName);
log.warn("消息发送到队列(Queue)[{}]时失败,消息内容[{}]", queueName, message.toString());
}
// ConfirmCallback接口用于实现消息发送到RabbitMQ交换器后接收ack回调
@Override
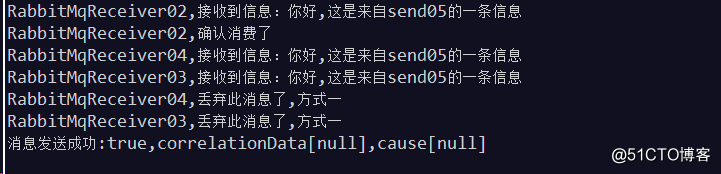
public void confirm(CorrelationData correlationData, boolean ack, String cause) {
if (ack) {
System.out.println("消息发送成功:" + ack + ",correlationData["+correlationData+"],cause["+cause+"]");
} else {
System.out.println("消息发送失败:" + ack + ",correlationData["+correlationData+"],cause["+cause+"]");
}
}
}RabbitMqSend02.java(普通模式)
import org.springframework.amqp.rabbit.core.RabbitTemplate;
import org.springframework.beans.factory.annotation.Autowired;
import org.springframework.stereotype.Service;

@Service
public class RabbitMqSend02 {
    @Autowired
    private RabbitTemplate rabbitTemplate;
    public void send(String str){
        rabbitTemplate.convertAndSend("springboot.Queue.02", str);
    }
}
RabbitMqSend03.java(主题匹配订阅模式,精确配置"springboot.topic.01"通道(Queue))
import org.springframework.amqp.rabbit.core.RabbitTemplate;
import org.springframework.beans.factory.annotation.Autowired;
import org.springframework.stereotype.Service;

@Service
public class RabbitMqSend03 {
    @Autowired
    private RabbitTemplate rabbitTemplate;
    public void send(String str){
        rabbitTemplate.convertAndSend("springboot.TopicExchange", "springboot.topic.01", str);
    }
}
RabbitMqSend04.java(主题匹配订阅模式,配置"springboot.topic"开头的任意通道(Queue))
import org.springframework.amqp.rabbit.core.RabbitTemplate;
import org.springframework.beans.factory.annotation.Autowired;
import org.springframework.stereotype.Service;

@Service
public class RabbitMqSend04 {
    @Autowired
    private RabbitTemplate rabbitTemplate;
    public void send(String str){
        rabbitTemplate.convertAndSend("springboot.TopicExchange", "springboot.topic.999", str);
    }
}
RabbitMqSend05.java(广播模式,配备与广播模式通道绑定的所有通道,忽略队列名称)
import org.springframework.amqp.rabbit.core.RabbitTemplate;
import org.springframework.beans.factory.annotation.Autowired;
import org.springframework.stereotype.Service;

@Service
public class RabbitMqSend05 {
    @Autowired
    private RabbitTemplate rabbitTemplate;
    public void send(String str){
        rabbitTemplate.convertAndSend("springboot.fanoutExchange", "", str);
    }
}
2.5 编写消费者类(都已经整合在一个类中,也可以单独拆分成多个处理类)
import java.io.IOException;

import org.springframework.amqp.core.Message;
import org.springframework.amqp.rabbit.annotation.RabbitListener;
import org.springframework.stereotype.Service;

import com.rabbitmq.client.Channel;

/**
 * <h5>描述:消息监听</h5>
 *  @RabbitListener可以如本类一样写在一个类中,也可以每一个类对应一个监听
 *  channel参数详解 https://www.cnblogs.com/piaolingzxh/p/5448927.html
 */
@Service
public class RabbitMqReceiver01 {

    @RabbitListener(queues = "springboot.Queue.01")
    public void process(Message message , Channel channel) {
        String messageStr = new String(message.getBody());
        System.out.println("RabbitMqReceiver01,接收到信息:"+ messageStr);
//      basicAck(message, channel);         // 确认消费
        basicAckException(message, channel, false, "springboot.Queue.02");// 模拟消费异常,发回到队列,重新消费
//      basicReject(message, channel);      // 丢弃此消息,方式一
//      basicNack(message, channel);        // 丢弃此消息,方式二
    }

    @RabbitListener(queues = "springboot.Queue.02")
    public void process2(Message message, Channel channel) {
        String messageStr = new String(message.getBody());
        System.out.println("RabbitMqReceiver02,接收到信息:"+ messageStr);
        basicAck(message, channel); // 确认消费
        System.out.println("RabbitMqReceiver02,确认消费了");
    }

    @RabbitListener(queues = "springboot.Queue.03")
    public void process3(Message message, Channel channel) {
        System.out.println("RabbitMqReceiver03,接收到信息:"+ new String(message.getBody()));
        basicReject(message, channel);  // 丢弃此消息,方式一
        System.out.println("RabbitMqReceiver03,丢弃此消息了,方式一");
    }

    @RabbitListener(queues = "springboot.Queue.04")
    public void process4(Message message, Channel channel) {
        System.out.println("RabbitMqReceiver04,接收到信息:"+ new String(message.getBody()));
        basicNack(message, channel);    // 丢弃此消息,方式二
        System.out.println("RabbitMqReceiver04,丢弃此消息了,方式一");
    }

    // ==================== private method ====================
    /**
     * <h5>功能:确认消费</h5>
     * @param message
     * @param channel
     */
    private void basicAck(Message message, Channel channel){
        try {
            // 确认消费
            channel.basicAck(message.getMessageProperties().getDeliveryTag(), false);
//          basicAck(message, channel);         // 确认消费
        } catch (IOException e) {
            e.printStackTrace();
        }
    }

    /**
     * <h5>功能:模拟消费异常,发回到队列,重新消费</h5>
     *  广播模式下不能使用此方法,否则会忽略Queue,进行再次广播,形成死循环
     * @param message 接收到的消息
     * @param channel 通道信息
     * @param isMySelfQueue 是否重新发送到自己的当前的队列(Queue)
     * @param newQueueName 发送到新的队列(Queue的名称)
     */
    private void basicAckException(Message message, Channel channel, boolean isMySelfQueue, String newQueueName){
        try {
            // 确认消费
            basicAck(message, channel);
            // 模拟业务处理发生异常,发回到新的消息队列
            String queueName = isMySelfQueue ? message.getMessageProperties().getReceivedRoutingKey() : newQueueName;
            System.out.println("RabbitMqReceiver01,业务处理发生异常,重新发送消息到队列["+ queueName + "]");
            channel.basicPublish(message.getMessageProperties().getReceivedExchange(), queueName, null, message.getBody());
        } catch (IOException e) {
            e.printStackTrace();
        }
    }

    /**
     * <h5>功能:丢弃此消息,方式一</h5>
     *  一次只能拒绝一条消息
     * @param message
     * @param channel
     */
    private void basicReject(Message message, Channel channel){
        try {
            // 拒绝消费,且拒绝再次进入队列;true表示会再次进入队列(如果一直拒绝,会造成死信),false标示不再进入队列
            channel.basicReject(message.getMessageProperties().getDeliveryTag(), false);
        } catch (IOException e) {
            e.printStackTrace();
        }
    }

    /**
     * <h5>功能:丢弃此消息,方式二</h5>
     * @param message
     * @param channel
     */
    private void basicNack(Message message, Channel channel){
        try {
            // 拒绝消费,且拒绝再次进入队列
            // 第二个参数为false表示每次拒绝一条消息,如果为true标示拒绝多条;
            // 第三个参数为true表示会再次进入队列(如果一直拒绝,会造成死信),false标示不再进入队列
            channel.basicNack(message.getMessageProperties().getDeliveryTag(), false, false);
        } catch (IOException e) {
            e.printStackTrace();
        }
    }
}
2.6 编写Controller进行调用
import javax.servlet.http.HttpServletRequest;

import org.springframework.beans.factory.annotation.Autowired;
import org.springframework.stereotype.Controller;
import org.springframework.web.bind.annotation.RequestMapping;

import com.qfx.system.service.RabbitMqSend01;
import com.qfx.system.service.RabbitMqSend02;
import com.qfx.system.service.RabbitMqSend03;
import com.qfx.system.service.RabbitMqSend04;
import com.qfx.system.service.RabbitMqSend05;

@Controller
@RequestMapping("send")
public class SendController {

    @Autowired
    private RabbitMqSend01 rabbitMqSend01;
    @Autowired
    private RabbitMqSend02 rabbitMqSend02;
    @Autowired
    private RabbitMqSend03 rabbitMqSend03;
    @Autowired
    private RabbitMqSend04 rabbitMqSend04;
    @Autowired
    private RabbitMqSend05 rabbitMqSend05;

    private static String viewPath = "../index";

    @RequestMapping("01")
    public String send01(HttpServletRequest request){
        rabbitMqSend01.send("你好,这是来自send01的一条信息");
        request.setAttribute("message", "send01发送一条消息成功");
        return viewPath;
    }
    @RequestMapping("02")
    public String send02(HttpServletRequest request){
        rabbitMqSend02.send("你好,这是来自send02的一条信息");
        request.setAttribute("message", "send02发送一条消息成功");
        return viewPath;
    }
    @RequestMapping("03")
    public String send03(HttpServletRequest request){
        rabbitMqSend03.send("你好,这是来自send03的一条信息");
        request.setAttribute("message", "send03发送一条消息成功");
        return viewPath;
    }
    @RequestMapping("04")
    public String send04(HttpServletRequest request){
        rabbitMqSend04.send("你好,这是来自send04的一条信息");
        request.setAttribute("message", "send04发送一条消息成功");
        return viewPath;
    }
    @RequestMapping("05")
    public String send05(HttpServletRequest request){
        rabbitMqSend05.send("你好,这是来自send05的一条信息");
        request.setAttribute("message", "send05发送一条消息成功");
        return viewPath;
    }
}
三. 执行测试
send01,直连模式,模拟业务处理异常,重新发送消息到其他队列

send02,直连模式,正常消费接收到的信息,并手工应答成功

send03,主题匹配订阅模式,03和04都匹配

send04,主题匹配订阅模式,仅04匹配

send05,广播模式,配置02、03、04
四.参考
https://www.cnblogs.com/BobXie85/p/8696374.html
http://www.ityouknow.com/springboot/2016/11/30/spring-boot-rabbitMQ.html
https://www.jianshu.com/p/0d400d30936b
http://www.cnblogs.com/sky-chen/p/9817509.html
channel参数详解
https://www.cnblogs.com/piaolingzxh/p/5448927.html
1.特别感谢以上文章的作者和其他信息来源者
2.本文如有错误之处,欢迎大神指正,谢谢
springboot(十三):springboot整合rabbitmq
1.前言RabbitMQ是一个消息队列,说到消息队列,大家可能多多少少有听过,它主要的功能是用来实现应用服务的异步与解耦,同时也能起到削峰填谷、消息分发的作用。消息队列在比较主要的一个作用是用来做应用服务的解耦,... 查看详情
springboot(十三)rabbitmq安装与集成
一、前言RabbitMQ是一个开源的消息代理软件(面向消息的中间件),它的核心作用就是创建消息队列,异步接收和发送消息,MQ的全程是:MessageQueue中文的意思是消息队列。##1.1使用场景-削峰填谷:用于应对间歇性流量提升对于... 查看详情
springboot入门:集成rabbitmq消息队列
本片文章续《SpringBoot入门(七):集成swagger2》,关于RabbitMQ的介绍请参考《java基础(六):RabbitMQ入门》1.增加依赖1<!--rabbitMq-->2<dependency>3<groupId>org.springframework.boot</groupId>4<artifactId>spring 查看详情
springboot整合rabbitmq入门~~
SpringBoot整合RabbitMQ 入门2020-01-12 创建生产者类,并且在yml配置文件中配置5要素连接MQyml配置文件 spring: & 查看详情
rabbitmq入门springboot集成rabbitmq(代码片段)
前言本文主要参考了UnderstandingAMQP,theprotocolusedbyRabbitMQ要学习rabbitmq,就要先学习amqp协议,amqp全称AdvancedMessageQueuingProtocol(AMQP),rabbitmq实现了amqp,当然rocketmq也实现了amqp。amqp中有几个重要的概念ÿ 查看详情
rabbitmq集成springboot消息队列入门demo
springboot集成RabbitMq还是很方便的。现在来一个简单的例子来集成rabbitmq。入门demo。主要概念:其中比较重要的概念有4个,分别为:虚拟主机,交换机,队列,和绑定。虚拟主机:一个虚拟主机持有一组交换机、队列和绑定。为... 查看详情
springbootrabbitmq入门学习(详细)(代码片段)
目录安装RabbitMQ初始化SpringBoot项目导入依赖添加配置配置文件application.yml添加配置类RabbitMqConfig简单队列发送者消费者测试类测试的Controller单元测试类运行路由(交换机)创建一个交换机(Exchange)交换机与队列... 查看详情
springboot整合rabbitmq(2021.05.29)(代码片段)
前篇回顾:RabbitMQ消息中间件入门1.Spring整合RabbitMQ1.1.搭建生产者工程1.1.1.创建工程1.1.2.添加依赖修改pom.xml文件内容为如下:<?xmlversion="1.0"encoding="UTF-8"?><projectxmlns="http://m 查看详情
rabbitmq入门springboot集成rabbitmq(代码片段)
前言本文主要参考了UnderstandingAMQP,theprotocolusedbyRabbitMQ要学习rabbitmq,就要先学习amqp协议,amqp全称AdvancedMessageQueuingProtocol(AMQP),rabbitmq实现了amqp,当然rocketmq也实现了amqp。amqp中有几个重要的概念,producer(p... 查看详情
(十三)springboot发送e-mail
一:添加mail依赖<dependency><groupId>org.springframework.boot</groupId><artifactId>spring-boot-starter-mail</artifactId></dependency> 二:添加邮件配置打开application.properties#邮箱 查看详情
springboot学习——springboot快速整合rabbitmq
RabbitMQ消息队列@[toc]简介优点erlang开发,并发能力强。社区活跃,使用的人多,稳定性较强。延时低缺点erlang语言开发的,国内精通的不多,日后定制开发困难。RabbitMQ工作模式1,"HelloWorld!"模式简单模式是RabbitMQ最简单入... 查看详情
springboot集成rabbitmq
前言 Rabbitmq是一个开源的消息代理软件,是AMQP协议的实现。核心作用就是创建消息队列,异步发送和接收消息。通常用来在高并发中处理削峰填谷、延迟处理、解耦系统之间的强耦合、处理秒杀订单。 入门... 查看详情
vs2010/mfc编程入门之五十三(ribbon界面开发:为ribbonbar添加控件)
前面一节中鸡啄米为大家简单介绍了如何创建Ribbon样式的应用程序框架,本节教程就来初步讲讲怎样为RibbonBar添加Ribbon控件。 VS2010为Ribbon界面开发提供了RibbonDesigner,通过它我们可以为RibbonBar... 查看详情
(转载)vs2010/mfc编程入门之五十三(ribbon界面开发:为ribbonbar添加控件)
前面一节中鸡啄米为大家简单介绍了如何创建Ribbon样式的应用程序框架,本节教程就来初步讲讲怎样为RibbonBar添加Ribbon控件。 VS2010为Ribbon界面开发提供了RibbonDesigner,通过它我们可以为RibbonBar添加... 查看详情
springboot系列——7步集成rabbitmq
...帮助我们实现异步、削峰的目的。今天这篇,我们来看看SpringBoot是如何集成RabbitMQ,发送消息和消费消息的。同时我们介绍下死信队列。集成RabbitMQ集成RabbitMQ只需要如下几步即可1、添加maven依赖<!--rabbitmq--><dependency>??<... 查看详情
springboot入门八,添加定时任务
SpringBoot添加定时任务非常简单,只需要两步即可1.SpringBoot启动类添加@EnableScheduling注解,开启定时任务的配置importorg.springframework.boot.SpringApplication;importorg.springframework.boot.autoconfigure.SpringBootApplication;importorg. 查看详情
springboot入门四,添加mybatis支持
项目基本配置参考SpringBoot入门一,使用myEclipse新建一个SpringBoot项目,使用myEclipse新建一个SpringBoot项目即可。现在来给项目添加一个MyBatis支持,添加方式非常简单,仅需两步即可,具体内容如下:1.pom.xml添加以下配置信息数据源采用... 查看详情
rabbitmq消息队列(十三)-virtualhost与权限管理(代码片段)
...据库的概念并且可以指定用户对库和表等操作的权限。那RabbitMQ呢?RabbitMQ也有类似的权限管理。在RabbitMQ中可以虚拟消息服务器VirtualHost,每个VirtualHost相当月一个相对独立的RabbitMQ服务器,每个VirtualHost之间是相互隔离的。exchang... 查看详情