关键词:
Ansible安装及初步使用
Ansible概述
由于互联网的快速发展导致产品更新换代速度逐渐加快,运维人员每天都要进行大量的维护操作,仍旧按照传统的方式进行维护工作会使得工作效率低下。这时,部署自动化运维就可以尽可能安全、高效地完成这些工作。
一般会把自动化运维工具划分为两类:一类是使用代理工具,与就是基于专用的Agent程序完成管理功能,如:Puppet、Func、Zabbix等;另外一类是不需要配置代理工具的,可以基于SSH服务来完成管理功能,如:Ansible、Fabric等。
Ansible基于Python开发,集合了众多的优秀运维工具的优点,实现了批量运行命令、部署程序、配置系统等功能。默认通过SSH协议进行远程命令执行下发配置,无需部署任何客户端代理软件,从而使得自动化环境部署变得更加简单。可以同时支持多台主机并行管理,使得管理主机更加便捷。
部署环境
| 角色 | 主机名 | IP地址 | 组名 |
|---|---|---|---|
| 控制主机 | rabbitmq01 | 192.168.58.142 | |
| 被管理主机 | rabbitmq02 | 192.168.58.132 | webserver |
| 被管理主机 | rabbitmq03 | 192.168.58.143 | dbserver |
部署实施
安装Ansible
可以使用源码安装也可以使用rpm包安装,这里直接使用yum仓库安装,需要依赖第三方的EPEL源。
[[email protected] ~]# yum install -y epel-release
#安装epel源
[[email protected] ~]# yum install ansible -y
#安装ansible软件包
[[email protected] ~]# ansible --version
ansible 2.6.2
  config file = /etc/ansible/ansible.cfg
#安装好后,可以查看版本信息
配置主机清单
Ansible通过默认主机清单/etc/ansible/hosts文件,修改主机与组配置后,可以连接到多个被管理主机上执行任务。
[[email protected] ~]# vim /etc/ansible/hosts
# This is the default ansible ‘hosts‘ file.
#
# It should live in /etc/ansible/hosts
#
#   - Comments begin with the ‘#‘ character
#   - Blank lines are ignored
#   - Groups of hosts are delimited by [header] elements
#   - You can enter hostnames or ip addresses
#   - A hostname/ip can be a member of multiple groups
[webserver]         #设计主机清单
192.168.58.132
[dbserver]
192.168.58.143
设置SSH密码登录
使用ssh-keygen产生一对密钥(公钥和私钥),使用ssh-copy-id来下发生成的公钥。
[[email protected] ~]# ssh-keygen -t rsa #产生密钥[[email protected] ~]# cd /root/.ssh/
[[email protected] .ssh]# ls
id_rsa id_rsa.pub #这就是产生的密钥
下面将id_rsa.pub公钥分发给被管理主机。
[[email protected] .ssh]# ssh-copy-id [email protected]
#分发给被管理主机
/usr/bin/ssh-copy-id: INFO: Source of key(s) to be installed: "/root/.ssh/id_rsa.pub"
The authenticity of host ‘192.168.58.132 (192.168.58.132)‘ can‘t be established.
ECDSA key fingerprint is SHA256:H7QKvUWPKe+VutgnWibgRHM/knIJq5CCZ7MEvSgiHXA.
ECDSA key fingerprint is MD5:8b:26:28:97:7a:d1:84:62:6f:f6:8d:2e:06:09:5e:5f.
Are you sure you want to continue connecting (yes/no)? yes
/usr/bin/ssh-copy-id: INFO: attempting to log in with the new key(s), to filter out any that are already installed
/usr/bin/ssh-copy-id: INFO: 1 key(s) remain to be installed -- if you are prompted now it is to install the new keys
[email protected]‘s password:                  #这里输入的是被管理主机的root密码,不是生成的密钥

Number of key(s) added: 1

Now try logging into the machine, with:   "ssh ‘[email protected]‘"
and check to make sure that only the key(s) you wanted were added.
[[email protected] .ssh]# ssh-copy-id [email protected]
#分发给另外一台被管理主机
完成上述操作后,就可以进行ansible操作
[[email protected] .ssh]# ansible webserver -a ‘ifconfig‘
Enter passphrase for key ‘/root/.ssh/id_rsa‘:
ens33: flags=4163<UP,BROADCAST,RUNNING,MULTICAST>  mtu 1500
        inet 192.168.58.132  netmask 255.255.255.0  broadcast 192.168.58.255
        inet6 fe80::f017:cc4f:7b2b:3652  prefixlen 64  scopeid 0x20<link>
        ether 00:0c:29:e7:34:3b  txqueuelen 1000  (Ethernet)
        RX packets 18857  bytes 20093953 (19.1 MiB)
        RX errors 0  dropped 0  overruns 0  frame 0
        TX packets 7340  bytes 584633 (570.9 KiB)
        TX errors 0  dropped 0 overruns 0  carrier 0  collisions 0

lo: flags=73<UP,LOOPBACK,RUNNING>  mtu 65536
        inet 127.0.0.1  netmask 255.0.0.0
        inet6 ::1  prefixlen 128  scopeid 0x10<host>
        loop  txqueuelen 1  (Local Loopback)
        RX packets 790  bytes 52247 (51.0 KiB)
        RX errors 0  dropped 0  overruns 0  frame 0
        TX packets 790  bytes 52247 (51.0 KiB)
        TX errors 0  dropped 0 overruns 0  carrier 0  collisions 0
设置SSH免交户代理
但是每次操作都会被要求输入ssh密码,这里设置免交户代理。
[[email protected] .ssh]# ssh-agent bash
[[email protected] .ssh]# ssh-add
Enter passphrase for /root/.ssh/id_rsa:        #输入ssh密码
Identity added: /root/.ssh/id_rsa (/root/.ssh/id_rsa)
这个时候我们再进行操作的时候,就不会再要求输入密码了。
[[email protected] .ssh]# ansible webserver -a ‘ifconfig‘
192.168.58.132 | SUCCESS | rc=0 >>
ens33: flags=4163<UP,BROADCAST,RUNNING,MULTICAST>  mtu 1500
        inet 192.168.58.132  netmask 255.255.255.0  broadcast 192.168.58.255
        inet6 fe80::f017:cc4f:7b2b:3652  prefixlen 64  scopeid 0x20<link>
        ether 00:0c:29:e7:34:3b  txqueuelen 1000  (Ethernet)
        RX packets 19025  bytes 20210670 (19.2 MiB)
        RX errors 0  dropped 0  overruns 0  frame 0
        TX packets 7451  bytes 599404 (585.3 KiB)
        TX errors 0  dropped 0 overruns 0  carrier 0  collisions 0

lo: flags=73<UP,LOOPBACK,RUNNING>  mtu 65536
        inet 127.0.0.1  netmask 255.0.0.0
        inet6 ::1  prefixlen 128  scopeid 0x10<host>
        loop  txqueuelen 1  (Local Loopback)
        RX packets 790  bytes 52247 (51.0 KiB)
        RX errors 0  dropped 0  overruns 0  frame 0
        TX packets 790  bytes 52247 (51.0 KiB)
        TX errors 0  dropped 0 overruns 0  carrier 0  collisions 0
Ansible命令应用
Ansible可以使用命令行方式进行自动化管理,管理工具是由一系列模块、参数支持的,可以在命令后面加上-h或者--help获取帮助,如使用ansible-doc工具可以通过ansible-doc -h或者ansible --help获取帮助信息。
ansible-doc是也用来查看模块帮助信息的工具,最主要的选项-l用来列出可使用的模块,-s用来列出某个模块的描述信息和使用示例。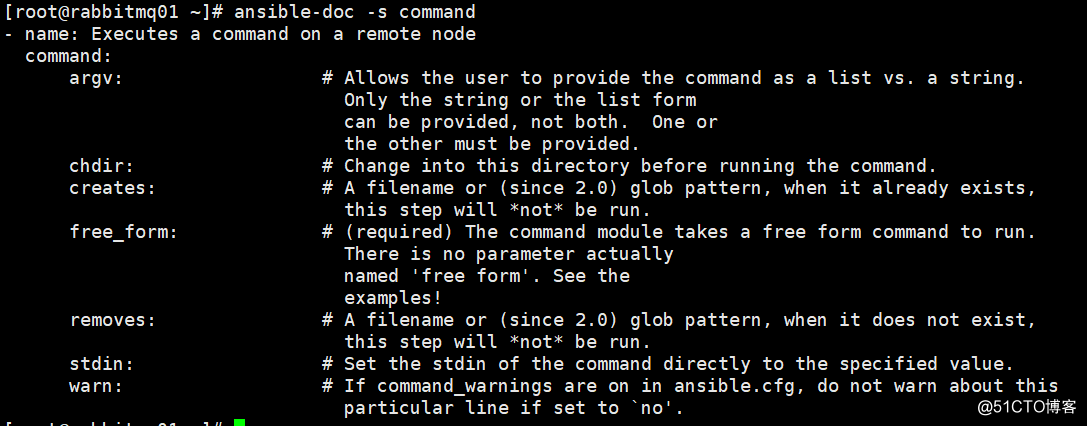
command模块
Ansible管理工具使用-m选项指定使用模块,默认使用command模块,-m选项省略也会运行此模块,用于在被管理主机上运行命令。
[[email protected] ~]# ansible webserver -m command -a ‘date‘
#使用ansible查看被管理主机日期信息
192.168.58.132 | SUCCESS | rc=0 >>
2018年 08月 01日 星期三 14:47:26 CST

[[email protected] ~]# ansible dbserver -a ‘date‘   #不使用-m时,默认就是command模块。
192.168.58.143 | SUCCESS | rc=0 >>
2018年 08月 01日 星期三 14:47:47 CST
cron模块
Ansible中cron模块用于定义计划性任务。其中有两种状态(state):present表示添加,absent表示移除。下面演示添加计划性任务:
[[email protected] ~]# ansible webserver -m cron -a ‘minute="*/10" job="/usr/bin/echo hello" name="test"‘
#这句话表示添加一个名称为test的计划性任务,完成每十分钟输出hello字符串的任务
192.168.58.132 | SUCCESS =>
    "changed": true,
    "envs": [],
    "jobs": [
        "test"
    ]
我们到webserver这台被管理主机上查看是否生成了这个计划性任务。
[[email protected] ~]# crontab -l  #查看计划性任务,可以看到已经生成
#Ansible: test
*/10 * * * * /usr/bin/echo hello
移除计划性任务
[[email protected] ~]# ansible webserver -m cron -a ‘name="test" state=absent‘
192.168.58.132 | SUCCESS =>
    "changed": true,
    "envs": [],
    "jobs": []


[[email protected] ~]# crontab -l
[[email protected] ~]#
#可以看到计划性任务已经被移除了
user模块
Ansible中的user模块用于创建新用户和更改、删除已经存在的用户。其中name选项用来指明创建的用户名称。
[[email protected] ~]# ansible webserver -m user -a ‘name="user1"‘
#创建一个user1的用户
192.168.58.132 | SUCCESS =>
    "changed": true,
    "comment": "",
    "create_home": true,
    "group": 1000,
    "home": "/home/user1",
    "name": "user1",
    "shell": "/bin/bash",
    "state": "present",
    "system": false,
    "uid": 1000


[[email protected] ~]# id user1
uid=1000(user1) gid=1000(user1) 组=1000(user1)
#到webserver查看user1用户
移除用户
[[email protected] ~]# ansible webserver -m user -a ‘name="user1" state=absent‘
192.168.58.132 | SUCCESS =>
    "changed": true,
    "force": false,
    "name": "user1",
    "remove": false,
    "state": "absent"


[[email protected] ~]# id user1
id: user1: no such user
group模块
Ansible中的group模块用于对用户组进行管理。
[[email protected] ~]# ansible webserver -m group -a ‘name=yx gid=400 system=yes‘
#添加一个叫yx的系统组。指定gid=400
192.168.58.132 | SUCCESS =>
    "changed": true,
    "gid": 400,
    "name": "yx",
    "state": "present",
    "system": true


[[email protected] ~]# tail -2 /etc/group
rabbitmq:x:986:
yx:x:400:
#可以看到创建成功

[[email protected] ~]# ansible webserver -m user -a ‘name="user2" uid=300 group=yx system=yes‘
#创建一个叫test02的系统用户,指定uid=300,所属组是yx
192.168.58.132 | SUCCESS =>
    "changed": true,
    "comment": "",
    "create_home": true,
    "group": 400,
    "home": "/home/user2",
    "name": "user2",
    "shell": "/bin/bash",
    "state": "present",
    "system": true,
    "uid": 300


[[email protected] ~]# id user2
uid=300(user2) gid=400(yx) 组=400(yx)
移除组和移除用户方法一样
copy模块
Ansible中的copy模块用于实现文件复制和批量下发文件。其中使用src来定义本地文件路径,使用dest定义被管理主机文件路径。使用content则是通过指定信息内容来生成目标文件。
[[email protected] ~]# ansible webserver -m copy -a ‘src=/etc/fstab dest=/opt/fstab.bk owner=root mode=600‘
#将本地/etc/fstab文件复制到被管理主机webserver中的/opt/fstab.bk,属主为root,权限为600
192.168.58.132 | SUCCESS =>
    "changed": true,
    "checksum": "317728dfdd657138fa15180e7c4318414c3d5774",
    "dest": "/opt/fstab.bk",
    "gid": 0,
    "group": "root",
    "md5sum": "b8d938e54772dcb1d95b3d5054d1f0a9",
    "mode": "0600",
    "owner": "root",
    "secontext": "system_u:object_r:usr_t:s0",
    "size": 595,
    "src": "/root/.ansible/tmp/ansible-tmp-1533107605.28-118537359554274/source",
    "state": "file",
    "uid": 0


[[email protected] ~]# cd /opt/
[[email protected] opt]# ll
总用量 4
-rw-------. 1 root root 595 8月   1 15:13 fstab.bk
drwxr-xr-x. 2 root root   6 3月  26 2015 rh
#可以看到已经生成了/opt/fstab.bk文件[[email protected] ~]# ansible webserver -m copy -a ‘content="this is test" dest=/opt/test.txt‘
192.168.58.132 | SUCCESS =>
"changed": true,
"checksum": "b6794b2000d94d348203d0279c2e7322b922cb16",
"dest": "/opt/test.txt",
"gid": 0,
"group": "root",
"md5sum": "8c6d115258631625b625486f81b09532",
"mode": "0644",
"owner": "root",
"secontext": "system_u:object_r:usr_t:s0",
"size": 12,
"src": "/root/.ansible/tmp/ansible-tmp-1533107768.16-134608628410659/source",
"state": "file",
"uid": 0
[[email protected] opt]# cat test.txt
this is test
#生成了test.txt这个文件file模块
在Ansible中使用file模块用于设置文件属性,其中path指定文件路径,使用src定义源文件路径,使用name或者dest替换创建文件的符号链接。
[[email protected] ~]# ansible webserver -m file -a ‘owner=mysql group=root mode=644 path=/opt/fstab.bk‘
192.168.58.132 | SUCCESS =>
    "changed": true,
    "gid": 0,
    "group": "root",
    "mode": "0644",
    "owner": "mysql",
    "path": "/opt/fstab.bk",
    "secontext": "system_u:object_r:usr_t:s0",
    "size": 595,
    "state": "file",
    "uid": 27


this is test[[email protected] opt]# ll
总用量 8
-rw-r--r--. 1 mysql root 595 8月   1 15:13 fstab.bk
drwxr-xr-x. 2 root  root   6 3月  26 2015 rh
#可以看到/opt/test.txt文件属性已经修改成功[[email protected] ~]# ansible webserver -m file -a ‘path=/opt/test.link src=/etc/passwd state=link‘
#将在被管理主机上,设置/opt/test.link为/etc/passwd文件的链接文件
192.168.58.132 | SUCCESS =>
"changed": true,
"dest": "/opt/test.link",
"gid": 0,
"group": "root",
"mode": "0777",
"owner": "root",
"secontext": "unconfined_u:object_r:usr_t:s0",
"size": 11,
"src": "/etc/passwd",
"state": "link",
"uid": 0
[[email protected] opt]# ll
总用量 8
-rw-r--r--. 1 mysql root 595 8月 1 15:13 fstab.bk
drwxr-xr-x. 2 root root 6 3月 26 2015 rh
lrwxrwxrwx. 1 root root 11 8月 1 15:21 test.link -> /etc/passwd
#生成成功ping模块
在Ansible中使用ping模块检测指定主机的连通性。
[[email protected] ~]# ansible dbserver -m ping
192.168.58.143 | SUCCESS =>
    "changed": false,
    "ping": "pong"

#连接正常
yum模块
在Ansible中的yum模块负责在被管理主机上安装卸载软件包,但是要每个节点部署yum仓库。name指定安装的软件包,不带版本号默认安装最新版本,state指定软件包状态,present、latest用于安装,absent表示卸载。
[[email protected] opt]# rpm -q httpd
未安装软件包 httpd
#在webserver上,未安装httpd

[[email protected] ~]# ansible webserver -m yum -a ‘name=httpd‘
192.168.58.132 | SUCCESS =>
    "changed": true,
    .....
[[email protected] ~]# rpm -q httpd
httpd-2.4.6-80.el7.centos.1.x86_64
#安装成功
service模块
在Ansible中使用service模块来控制管理服务器的运行状态。其中使用enabled表示是否开机启动,取值true或者false;只用name定义服务名称;使用state指定服务状态,取值为started、stoped、restarted。
[[email protected] ~]# netstat -ntap | grep 80

[[email protected] ~]# ansible webserver -m service -a ‘name=httpd enabled=true state=started‘
192.168.58.132 | SUCCESS =>
    "changed": true,
    "enabled": true,
    "name": "httpd",
    "state": "started",

[[email protected] ~]# netstat -ntap | grep 80
tcp6       0      0 :::80                   :::*                    LISTEN      7110/httpd
shell模块
Ansible中的shell模块可以在管理主机上运行命令,并支持像管道符号等功能的复杂命令。
[[email protected] ~]# ansible webserver -m shell -a ‘echo "abc123"|passwd --stdin user2‘
#这就是使用无交互模式给用户设置密码
192.168.58.132 | SUCCESS | rc=0 >>
更改用户 user2 的密码 。
passwd:所有的身份验证令牌已经成功更新。
script模块
Ansible中的script模块可以将本地的脚本复制到管理主机上运行。
#在本地创建一个脚本
[[email protected] ~]# vim test.sh
[[email protected] ~]# chmod +x test.sh
[[email protected] ~]# cat test.sh
#!/bin/bash
echo "this is a test" > /opt/script.txt
[[email protected] ~]# ansible webserver -m script -a ‘/root/test.sh‘
192.168.58.132 | SUCCESS =>
    "changed": true,
    "rc": 0,
    "stderr": "Shared connection to 192.168.58.132 closed.
",
    "stderr_lines": [
        "Shared connection to 192.168.58.132 closed."
    ],
    "stdout": "",
    "stdout_lines": []


[[email protected] opt]# ls
fstab.bk  rh  script.txt  test.link  test.txt
[[email protected] opt]# cat script.txt
this is a test
#脚本执行成功
setup模块
在Ansible中使用setup模块收集、查看被管理主机的facts(facts是Ansible采集被管理主机设备信息的一个功能)。每个被管理主机在接受并运行管理命令之前,都会将自己的相关信息发送给控制主机。
[[email protected] ~]# ansible webserver -m setup
192.168.58.132 | SUCCESS =>
    "ansible_facts":
        "ansible_all_ipv4_addresses": [
            "192.168.58.132"
        ],
        "ansible_all_ipv6_addresses": [
            "fe80::f017:cc4f:7b2b:3652"
        ],
        "ansible_apparmor":
            "status": "disabled"
        ,
....省略,信息很多
ansible的安装配置及常用模块介绍(代码片段)
Ansible的安装、配置及常用模块介绍 ansible安装方式1、ansible安装常用两种方式,yum安装和pip程序安装这里提供二种安装方式,任选一种即可:1、使用yum安装yuminstallepel-release-yyuminstallansible–y2、使用pip(python的包管理模块)安... 查看详情
ansible安装及模块的管理(代码片段)
简介1、ansible安装部署过程特别简单,学习曲线很平坦;2、不需要单独安装客户端,知识利用现有的SSHD服务(协议)即可。3、基于Python开发,集合了众多运维工具(puppet、chef、func、fabric)的优点,实现了批量系统配置、批量... 查看详情
ansible概述及常用命令模块(代码片段)
Ansible概述及常用命令模块一、Ansible概述特点二、部署ansible1.使用yum安装epel源和ansible2.配置主机清单3.配置密钥对验证三、ansible常用命令行模块1.command模块2.shell模块3.cron模块4.user模块5.group模块6.copy模块7.file模块8.hostname模块9.ping... 查看详情
ansible概述及常用命令模块(代码片段)
Ansible概述及常用命令模块一、Ansible概述特点二、部署ansible1.使用yum安装epel源和ansible2.配置主机清单3.配置密钥对验证三、ansible常用命令行模块1.command模块2.shell模块3.cron模块4.user模块5.group模块6.copy模块7.file模块8.hostname模块9.ping... 查看详情
ansible安装及常用模块(代码片段)
配置文件:/etc/ansible/ansible.cfg主机列表:/etc/ansible/hosts 安装anslibe wget-O/etc/yum.repos.d/epel.repohttp://mirrors.aliyun.com/repo/epel-6.repoyum-yinstallansible配置文件先备份修改配置文件hosts添加主机组(分组) 如 查看详情
自动化运维之ansible安装及命令使用(代码片段)
Ansible介绍ansible是新出现的自动化运维工具,基于Python开发,集合了众多运维工具(puppet、chef、func、fabric)的优点,实现了批量系统配置、批量程序部署、批量运行命令等功能。ansible是基于paramiko开发的,并且基于模块化工作,... 查看详情
ansible概述及各模块应用(代码片段)
ansible概述及各模块应用ansible概述ansible特点ansible工作原理==ansible工具优点==ansible环境部署ansible命令模块command模块cron模块user模块group模块copy模块file模块ping模块service模块模块shell模块script模块yum模块setup模块ansible概... 查看详情
ansible安装及基础模块介绍(代码片段)
ansible介绍Ansible基于Python开发,集合了众多优秀运维工具的优点,实现了批量运行命令部署程序、配置系统等功能。默认通过SSH协议进行远程命令执行或下发配置,无需部署任何客户端代理软件,从而使得自动化环境部署变得更加简单... 查看详情
自动化运维工具ansible——安装及模块管理(代码片段)
ansible简介?ansible是新出现的自动化运维工具,基于Python开发,集合了众多运维工具(puppet、cfengine、chef、func、fabric)的优点,实现了批量系统配置、批量程序部署、批量运行命令等功能。?ansible是基于模块工作的,本身没有批量... 查看详情
ansible的入门及常见模块总结实战(代码片段)
Ansible帮助获取:?ansible-doc-s模块名##查看指定模块的帮助信息?ansible-doc-l##查看支持的所有模块常用模块:模块名用途file文件管理,创建文件、目录或链接文件copy/synchronize用于传输文件或目录,对于copy传输慢建议采用synchronize(r... 查看详情
ansible架构原理及工作流程(代码片段)
一、ansible介绍ansible是一种自动化运维工具,基于paramiko模块开发,用于批量执行任务和发布工作,被广泛用于日常运维工作当中.二、ansible架构架构图:ansible核心模块介绍:coremodels:ansible自带的模块,file,shell,copy等custommodels:ansible自... 查看详情
ansible安装及模块管理(最全操作,可跟做!)(代码片段)
一、Ansible安装环境准备管理端:CentOS7-2192.168.18.147被管理端1:CentOS7-3192.168.18.128被管理端2:CentOS7-4192.168.18.148管理端:[root@localhost~]#systemctlstopfirewalld.service[root@localhost~]#setenforce0[root@localhost~]#yuminstallepel-release-y[root@localhost~]#yuminst... 查看详情
ansible架构介绍及部署(代码片段)
Ansible架构模式Ansible是由控制机和被管理机组成:控制机是用来安装Ansible工具软件和执行指令的服务器,被管理机是指运行业务的服务器,由控制机通过SSH进行管理。Ansible管理方式Ansible是一个模型驱动管理器,支持多节点发布... 查看详情
ansible概述及各模块应用(代码片段)
ansible概述及各模块应用ansible概述ansible特点ansible工作原理==ansible工具优点==ansible环境部署ansible命令模块command模块cron模块user模块group模块copy模块file模块ping模块service模块模块shell模块script模块yum模块setup模块ansible概... 查看详情
ansible概述及各模块应用(代码片段)
ansible概述及各模块应用ansible概述ansible特点ansible工作原理==ansible工具优点==ansible环境部署ansible命令模块command模块cron模块user模块group模块copy模块file模块ping模块service模块模块shell模块script模块yum模块setup模块ansible概... 查看详情
ansible安装及原理
介绍两种安装方式yum和编译1)yum安装yuminstallansible-y 2)编译安装 ... ansible原理和架构主要包含6个组件:1)Ansible核心2)Inventory主机清单3)Modules模块4)Playbook剧本5)Plugins插件6)连接插件 1.1)ansible提供了两种方... 查看详情
ansible常用命令及模块的使用方法
ansible是指令核心部分,其主要用于执行ad-hoc(点对点)命令,即单条命令。默认后面需要跟主机和选项部分,默认不指定模块时,使用的是command模块。2.默认使用的模块是可以在ansible.cfg中进行修改的。/etc/ansible/ansible.cfgansible... 查看详情
ansible之主机清单及playbook剧本(代码片段)
Ansible之主机清单及playbook剧本一、主机清单inventory变量参数Inventory中的变量二、YAML1.基本语法规则2.YAML支持的数据结构三、playbook1.组成部分2.运行playbook3.定义、引用变量4.指定远程主机sudo切换用户5.when条件判断6.迭代四、Templates... 查看详情